UPDATE: I was informed by Sebastien Ros from the Orchard team that some of the code below exposed an Cross-site Scripting (XSS) vulnerability by writing out the raw value of t.TagName to the markup to be rendered by the alternate template. I’ve updated the listings (and my blog) with some code/markup suggested by Sebastien that both simplifies the code and takes advantage of Razor’s built-in HTML encoding when using the @ block syntax. While the risk of an XSS attack on the tags is relatively small, it’s always a good idea to apply HTML encoding to your strings before rendering them. My thanks to Sebastien for catching that.
Background
One of the first things folks typically want to do after they install Orchard CMS is start customizing the look and feel of their site or blog. The easiest way to do this, of course, is to install one of the themes available from the Orchard Gallery. One theme in particular, The Theme Machine, is designed to facilitate customization, and in fact there’s a whole section of the Orchard documentation devoted to the subject of customization based on The Theme Machine. There are also customizable themes that you can purchase from the folks at http://bind.pt/ (my theme is a custom version of one of theirs).
While the docs for customizing The Theme Machine are very useful, you may end up wanting to customize a different theme and truth be told, it can be a little tricky, especially for the beginner, figuring out exactly how to customize a specific part of your existing site, given the deep customizability that is provided by Orchard, based on Shapes and Templates (read more about these in the Orchard Basic Concepts docs).
One way to customize how various parts of your site render is to define an Alternate for that part, which allows you to override the default shape for a given part of your site (items, parts, or whole views) with a variation of your choosing. Alternates use naming and URL conventions to make it relatively easy to implement an Alternate and have Orchard automatically wire it up in place of the default, without writing additional code. That said, if you take a look at the docs at the link above, it’s still a bit challenging to figure out exactly where to start.
The Designer Tools Module
This is where the Designer Tools module comes in. This module adds two important features to your Orchard site: Shape Tracing and Url Alternates. Shape Tracing is similar to the Inspect feature in Firebug (or the Select Element by Click feature in the IE developer tools), in that when Shape Tracing is enabled and active, you can hover over the different parts of a given page, and click to see a ton of information about that particular part of the page, including the Shape currently being rendered, the active template from which it was rendered, a list of available Url Alternates for that part (complete with links to create them in your themes directory), as well as information about the model from which the part was rendered, the placement info for the part, the code of the template used for rendering, and finally the HTML output for that part.
Url Alternates, when enabled, automates the wiring up of alternates based on the naming conventions mentioned earlier, conventions that shape tracing enables automatically when it creates an alternate for you.
That’s a lot of information, so let’s walk through the process of customizing your site with an Alternate using the Shape Tracing feature of the Designer Tools module.
Quick Walkthrough
The very first step in the process, of course, is having an Orchard CMS site up and running. I strongly recommend that you use the Designer Tools Shape Tracing feature only on the local or development version of your Orchard site, because the feature injects a large amount of additional data and script into your page in order to enable the feature. For example, the home page of https://devhammer.net, with Shape Tracing off weighs in at around 27.7 KB (I could probably whittle that down a bit, but not awful). When I turn on Shape Tracing, that goes up to a whopping 3.7 MB! That doesn’t mean there’s anything wrong with the Designer Tools module…just that it’s probably not a great idea to enable them on a production site.
Once you have a local copy of your site (Microsoft WebMatrix makes this really simple with its Download Published Site command), sign in, go to the dashboard, and follow these steps:
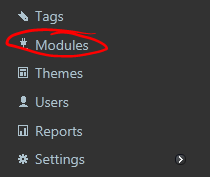
- Locate and click the Modules link in the dashboard. This will open the Modules admin page:
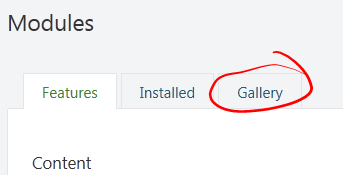
- Click the Gallery link:
- In the Search box on the Gallery tab (upper right corner), type in “Designer” and click the Search button:

The first module listed (at the time of this writing) will be the Designer Tools Module. Note that I am using version 1.1.3 of Orchard, which is also the version of the Designer Tools module.

- Click the Install link (highlighted above) to install the module.
- When the initial module install is complete, you’ll be prompted for which features you’d like to enable…as a reminder, you should avoid enabling the Shape Tracing feature on a public-facing site due to the increased page size, among other reasons (I’ll discuss more below):
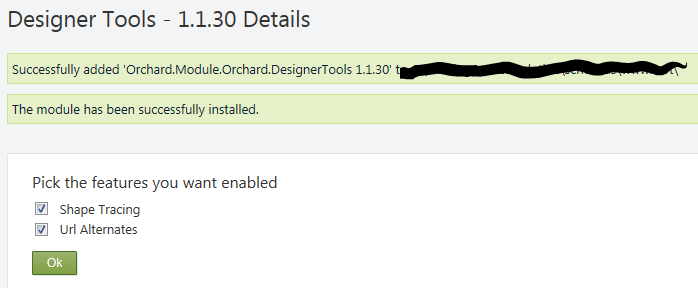
- Click OK to enable both Shape Tracing and Url Alternates. You should see a message for each feature indicating that it was enabled. Next click the Your Site link at the top of the page to go to your home page.
- Once enabled, the Shape Tracing feature will display as a small toolbar at the bottom of the browser window, similar to how Firebug works…look for the icon below in the lower right corner:

- Click the icon to expand the Shape Tracing pane:

On the left, you’ll see a list of the active Zones on the current page, as well as additional shapes currently in use. On the right are a series of buttons that will provide details for particular properties of the shape selected in the left-hand pane. Here’s a brief description of each:
- Click the icon to expand the Shape Tracing pane:
- Once enabled, the Shape Tracing feature will display as a small toolbar at the bottom of the browser window, similar to how Firebug works…look for the icon below in the lower right corner:
- Click OK to enable both Shape Tracing and Url Alternates. You should see a message for each feature indicating that it was enabled. Next click the Your Site link at the top of the page to go to your home page.
- When the initial module install is complete, you’ll be prompted for which features you’d like to enable…as a reminder, you should avoid enabling the Shape Tracing feature on a public-facing site due to the increased page size, among other reasons (I’ll discuss more below):
- Click the Install link (highlighted above) to install the module.
- In the Search box on the Gallery tab (upper right corner), type in “Designer” and click the Search button:
- Click the Gallery link:
- Model: Displays a hierarchical view of the model from which the current shape was rendered.
- Placement: Shows the Placement.info file affecting the currently selected shape, if one exists.
-
Template: Displays the source code for the currently active template used to render the shape, if applicable.
- HTML: Shows the HTML markup rendered by the currently selected shape.
What Did We Learn?
As you can see, the Shape Tracing feature offers powerful tools for understanding and troubleshooting how different parts of your Orchard site are rendered. But it doesn’t stop there. When Shape Tracing is enabled, you can hover over any part of the active page to highlight specific shapes. When the desired part of the page is highlighted, click to select it, and view all of the above information about that specific shape.
Easier Customization with Shape Tracing
So what does all this have to do with making customization easier? Well, in addition to giving you tools to understand how the various pieces of Orchard work together from a UI standpoint, you can create Url Alternates directly from the Shape Tracing pane, as shown in the following steps:
- With the Shape Tracing feature enabled, highlight and select the part of the page you wish to customize:
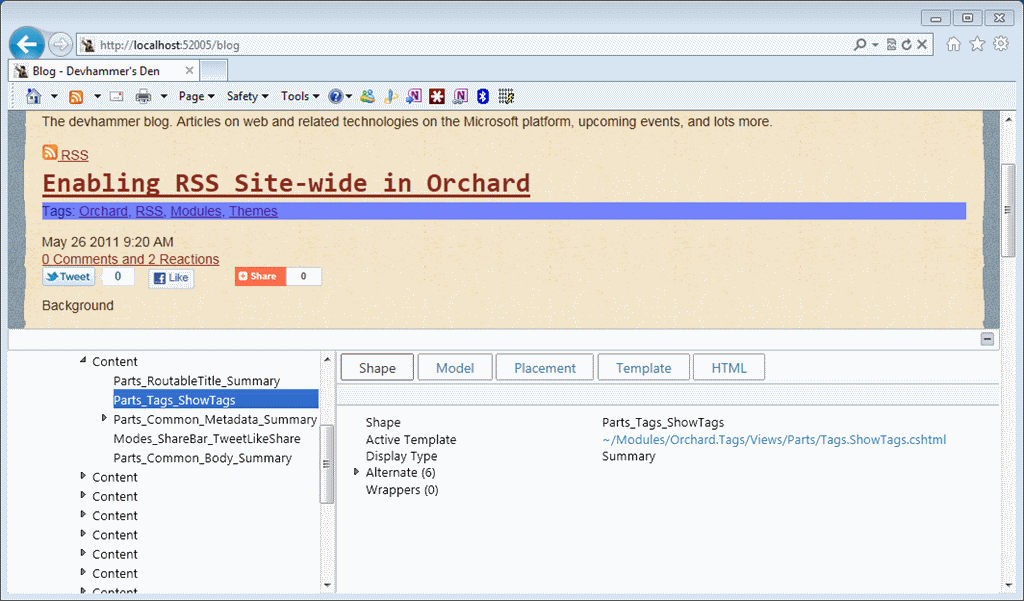
- Now, let’s say I wanted to customize the look of my blog tags, to add background graphics (an idea I borrowed from Jason Gaylord). Since I’ve got the tags section of one of my blog posts selected, I can simply expand the list of available Alternates, by clicking on the arrow next to it in the right-hand pane, which shows me the following:
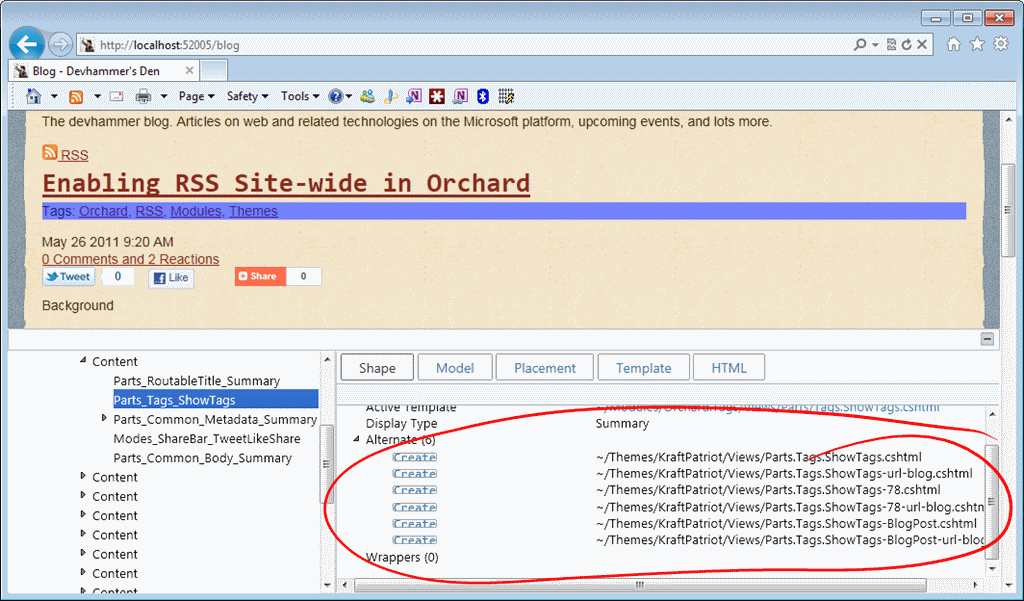
Each of the available alternates covers a particular Url schema, from the generic (Parts.Tags.ShowTags.cshtml, which would apply across all instances of the shape) to the specific (Parts.Tags.ShowTags-78-url-blog.cshtml, which would apply only to the selected blog post, and only when shown on the blog page (as opposed to in a widget on the home page). This gives me great control over where and when I’m customizing a given shape. As mentioned earlier, when the Url Alternates feature of the Designer Tools module is enabled, once the alternate is created, it will automatically be wired up and used to render the selected shape.- Speaking of creating the alternate…I can do that right from this screen. Just click the “Create” link for the desired alternate. In my case, I want the alternate Parts.Tags.ShowTags.cshtml, which will allow me to customize the rendering of tags for anywhere that tags are used, unless a more specific alternate is in place (alternates are applied from more general to more specific, so a more specific alternate will take precedence over a less specific one). Note that the alternate will be created inside the Views folder of the currently active theme, so if you change themes, your alternate will no longer be active unless you copy it to the new theme. When I click “Create”, the page will refresh, and the Shape Tracing pane will close.
- Next, I switch over to my Orchard project in Microsoft WebMatrix, and check the Views folder of the selected theme:
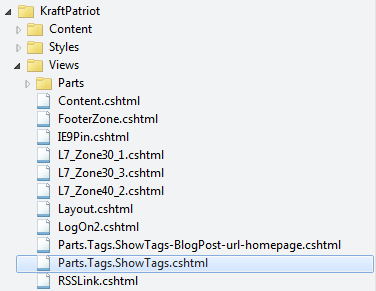
And there’s my new alternate, highlighted above. Note that I’ve got a few other alternates and custom templates added earlier as well. Here’s the code for the alternate, before any customization:1: @{2: var tagsHtml = new List<IHtmlString>();
3: foreach(var t in Model.Tags) {
4: if (tagsHtml.Any()) {
5: tagsHtml.Add(new HtmlString(", "));
6: }7: tagsHtml.Add(Html.ActionLink((string)t.TagName, "Search", "Home",
8: new { area = "Orchard.Tags", tagName = (string)t.TagName }, new { }));
9: }10: }11:12: @if (tagsHtml.Any()) {
13: <p class="tags">
14: <span>@T("Tags:")</span>
15: @foreach(var htmlString in tagsHtml) { @htmlString }
16: </p>17: }Essentially, the existing code grabs any tags associated with the current Model object, then renders out a
with the class “tags”, a , and the HTML output of each tag, which includes a link to the associated tag. The ActionLink HtmlHelper automatically encodes the output of the display string, for anyone wondering about XSS here.
-
In order to add the background images, we need to have a little CSS added to the site.css for the selected theme (again, borrowed from Jason Gaylord‘s excellent theme):
1: .tags { font-size: 0.9em; font-weight: bold; }
2: .tags a { color: #996633; text-decoration: none; }
3: .tag-left { padding: 3px 4px 3px 18px; background: url('tag_left.png') no-repeat left center; }
4: .tag-right { padding: 3px 4px 3px 0; background: url('tag_right.png') no-repeat right center; margin-right: 5px; }
The above style will display a background image for elements with the class “tag-left” or “tag-right”.
-
Once the CSS is in place, we simply need to modify the alternate to insert tags and apply the appropriate class (
there’s almost certainly a more elegant way to do this, but the code below works…I’ve left the original code in, commented out, for clarity on the changes I made), thanks to Sebastien Ros from the Orchard team, I’ve got a more elegant (and safer) way of doing this:1: <p class="tags">
2: @foreach(var t in Model.Tags) {3: <a href="@Url.Action("Search", "Home",
4: new { area = "</span>Orchard.Tags", tagName = (string)t.TagName })"><span
5: class="tag-left">@t.TagName</span><span class="tag-right"></span></a>
6: }7: </p>
Once the changes have been made, all I need to do is save the alternate, and visit a page that uses tags, and voila!

- Next, I switch over to my Orchard project in Microsoft WebMatrix, and check the Views folder of the selected theme:
- Speaking of creating the alternate…I can do that right from this screen. Just click the “Create” link for the desired alternate. In my case, I want the alternate Parts.Tags.ShowTags.cshtml, which will allow me to customize the rendering of tags for anywhere that tags are used, unless a more specific alternate is in place (alternates are applied from more general to more specific, so a more specific alternate will take precedence over a less specific one). Note that the alternate will be created inside the Views folder of the currently active theme, so if you change themes, your alternate will no longer be active unless you copy it to the new theme. When I click “Create”, the page will refresh, and the Shape Tracing pane will close.
- Now, let’s say I wanted to customize the look of my blog tags, to add background graphics (an idea I borrowed from Jason Gaylord). Since I’ve got the tags section of one of my blog posts selected, I can simply expand the list of available Alternates, by clicking on the arrow next to it in the right-hand pane, which shows me the following:
<p> The beauty of this approach is that I can customize at either a very general level, as in the preceding example, or a very specific one, as in the case of the Parts.Tags.ShowTags-BlogPost-url-homepage.cshtml alternate that I’d created earlier, which simply suppresses the display of tags on the home page. Because the latter is a more specific alternate, it takes precedence when the Url (in this case the home page) and target shape (tags on a blog post) are a match. Otherwise, the more general alternate is used. </p> <h2> Conclusion </h2> <p> The Designer Tools module is an excellent way of learning your way around shapes and alternates in Orchard, and an easy way to start customizing specific shapes without having to manually figure out the naming convention required to override Orchard’s default shapes for a given part of the page that you wish to tweak. </p> <p> Remember that Shape Tracing is a feature best used on a local copy of your site, due to the additional markup and script that it adds to the page, as well as the fact that it provides a means of adding new files (for alternates) to your site, something you don’t, as a rule, want to allow the general public to do. Remember also that the Url Alternates must be enabled in order for your alternates to be automatically wired up based on the naming conventions that Orchard uses. </p> <p> I hope that you’ve found this tour of the Designer Tools module for Orchard CMS useful. Check back periodically for more Orchard posts as I delve deeper into customizing my site. </p> <p> Special thanks to <a href="http://jasongaylord.com/" target="_blank">Jason Gaylord</a> for sharing his CSS and images for the graphical tag feature. Much appreciated! Jason has promised some cool upcoming posts on his implementation of Orchard, including his nifty weather module (head over to his blog and mouse over the weather icon, and you’ll see what I mean). </p>Comments
Comment by Paintball Barrel on 2011-06-04 17:07:00 +0000
I’m off to give this a try right now. Thanks.
Comment by Sebastien Ros on 2011-06-04 18:22:00 +0000
You should really refactor this template, it’s prone to cross site scripting as you are writing as is the tag names, without encoding. It’s pretty easy an nice in Razor. Here is what you need, it’s the full source:
[Devhammer: Managed to fix the encoding on the code sample, so restoring Sebastien’s original code here]
@if (tagsHtml.Any())
{Hi.
Using Shape Tracing on the TheThemeMachine theme, we can click Shape, Model, Placement, and so on, and see the code of the parts and such below.
Using a bind theme, those do not appear
Have you tried this? I know the layout.cshtml has different markup, so I can’t expect the auto scroll to function and stuff like that but if seems some other features are needlesly connected to the default theme.
Any thoughts?
Cheers, Tiago.Comment by Mario Saccoia on 2011-11-14 12:38:00 +0000
Good article
-
- Placement: Shows the Placement.info file affecting the currently selected shape, if one exists.