[This is part 7 of an ongoing series of posts examining the HTML5 Canvas element. In Part 1 of this series, I introduced Canvas and prepared a template to make further explorations a bit simpler, and also introduced JsFiddle, a neat tool for experimenting with and sharing web code. In Part 2, I demonstrated the ability of Canvas to allow your page background to shine through, and showed you how to render simple shapes on the drawing surface. In Part 3, I showed how to draw paths and text in Canvas. In Part 4, I showed how to transform the drawing context and scale, rotate, and skew your drawings. In Part 5, I introduced basic animation concepts, including the animation loop. In Part 6, I demonstrated some techniques for managing multiple animated shapes in your Canvas implementations.]
Performance Matters
As you start working with HTML5 Canvas, one of the things that you may discover is that the more things you’re drawing, the more likely it is that you will run into performance issues, particularly if your code is not optimized. This is also true the larger your canvas gets, which may especially impact full-screen games or similar implementations.
I recently ran across a nice article on HTML5 Rocks that detailed a number of performance optimizations for HTML5 Canvas. Over the last several months I’ve been doing a lot of talks about building Windows Store apps for Windows 8 using HTML5 and JavaScript, and one of my demos involves showing how easy it is to repurpose the code from my Basic Animation part of this series for use in a Windows Store app. The problem I ran into was that as I scaled my canvas to run full screen as an app, the performance was degrading. While the article in question has been around for a while, the optimizations discussed looked quite promising, so I wanted to play around with them and see if they’d help improve my canvas performance.
So after reading through the article above, I figured I’d give a couple of the optimizations discussed a try. Three optimizations caught my eye:
- Using multiple layered canvases to avoid redrawing large images (in our case, the grid that I use for reference when drawing objects, but in a game this might include the game background)
-
Using clearRect instead of the canvas.width = canvas.width hack to clear the canvas prior to redrawing.
- Taking advantage of the requestAnimationFrame API that is supported across most modern browsers, including Internet Explorer 10.
-
Measuring Performance
The bad news is that I was not able to find a good and accurate way to measure performance in a cross-browser fashion. There are certainly scripts you can include that will measure some aspects of how your code is executing, but they don’t really give you an accurate representation of how many frames per second you’re getting consistently. Most desktop graphics systems provide APIs specifically for this purpose, but browsers, as a rule, don’t. At least not yet (Firefox has an API they’ve been working on, but to my knowledge it hasn’t been adopted elsewhere).
So what I’m planning to do is start with the example from Part 6 of this series, and ramp up the number of animated objects to the point where it chews up significant amounts of processor time, apply the optimizations, and see whether I can see a consistent difference between the pre- and post-optimization versions.
The Starting Point
In Part 6, we left off with several animated sprites, each with it’s own size, speed, and direction. To kick things off, I’m going to update that example to run full-screen (as opposed to the original 500×500), and to create a random collection of sprites, with random size, speed, and direction, then ramp up the number of sprites to the point where it taxes my processor significantly.
First, I’ll update my code to set the canvas to be the full width and height of the client window:
1: var fullWidth = document.body.clientWidth;
2: var fullHeight = document.body.clientHeight;
3:
4: canvas.width = fullWidth;
5: canvas.height = fullHeight;
Next, I’ll add a function to create random WokkaWokka sprites, and update the creation of the sprite array to call the new function in a loop:
1: function randomWokkaWokka() {
2: var size = Math.floor((Math.random()*50)+1);
3: var direction = Math.floor((Math.random()*4)+1)*90;
4: if(direction===360){direction = 0;}
5: var speed = Math.floor((Math.random()*20)+1);
6: var posX = Math.floor((Math.random()*fullWidth)+1);
7: var posY = Math.floor((Math.random()*fullHeight)+1);
8: return new WokkaWokka(size, direction, speed, posX, posY);
9: }
10:
11: var WokkaWokkas = new Array();
12: var i, WW;
13: for (i=0;i<250;i++) {
14: WW = randomWokkaWokka();
15: WokkaWokkas.push(WW);
16: }
In lines 2-7, I’m using Math.floor and Math.random to create random values for size, direction, speed, and starting position, within the desired ranges for each value. In the case of direction, I’m multiplying the result by 90 to get a value matching the up, down, left, right values my animation code expects, but since line 3 will never give me a zero value (it gives 360 instead), I test for 360 and correct to 0 in line 4.
In line 8, I call the original function for creating a WokkaWokka sprite, passing in the randomly created values.
In lines 11-15, I create the number of sprites corresponding to the number of loop iterations. Here’s a screenshot of the mayhem when run in the full browser window (you can run the code using the Result button in the fiddle listing below to see it in action):
Here’s what happens to my processor when I run the code:
That’s a fair amount of load for a single Canvas app, so it’s safe to say we have some room for optimization.
Here’s the full code listing for the starting point:
Using Multiple Layers
The first optimization we’ll apply is to add multiple layers, so that the background grid is drawn only once, rather than on each iteration of our animation loop. To start, we’ll add a second canvas element, with the CSS position set to “absolute” and using the CSS z-index to layer the main canvas on top of the background canvas. We’ll take advantage of canvas transparency to allow the background to show through (the browser is responsible for compositing the two canvas elements when the code runs):
1: <canvas id="myBackground" style="position: absolute; z-index: 0;">
2: <p>Canvas not supported.</p>
3: </canvas>
4: <canvas id="myCanvas" style="position: absolute; z-index: 1;">
5: <p>Canvas not supported.</p>
6: </canvas>
We need to have our background canvas set to the size of the client window like the main canvas, so we’ll add code to the initialization section do that:
1: var bgCanvas = $("#myBackground").get(0);
2: var bgContext = bgCanvas.getContext("2d");
3: var bgRendered = false;
4: var canvas = $("#myCanvas").get(0);
5: var context = canvas.getContext("2d");
6: var up = 90,
7: right = 0,
8: down = 270,
9: left = 180;
10:
11: var fullWidth = document.body.clientWidth;
12: var fullHeight = document.body.clientHeight;
13:
14: bgCanvas.width = fullWidth;
15: bgCanvas.height = fullHeight;
16: canvas.width = fullWidth;
17: canvas.height = fullHeight;
The new code is in lines 1-2, where we get the necessary references to the background canvas element and its 2d drawing context, in line 3, where we add a variable to indicate whether the background has been rendered, and lines 13-14, where we set the width and height of the background canvas to the full size of the client window.
Next, in lines 3-5 below, we modify the animationLoop function to only render the grid if the bgRendered variable is set to “false”:
1: function animationLoop() {
2: canvas.width = canvas.width;
3: if (!bgRendered) {
4: renderGrid(20, "red");
5: }
6: // remaining code omitted
Finally, we need to update the renderGrid function to use the background canvas, and to set the bgRendered variable to “true” once it has rendered the grid:
1: function renderGrid(gridPixelSize, color) {
2: bgContext.save();
3: bgContext.lineWidth = 0.5;
4: bgContext.strokeStyle = color;
5:
6: // horizontal grid lines
7: for (var i = 0; i <= canvas.height; i = i + gridPixelSize) {
8: bgContext.beginPath();
9: bgContext.moveTo(0, i);
10: bgContext.lineTo(canvas.width, i);
11: bgContext.closePath();
12: bgContext.stroke();
13: }
14:
15: // vertical grid lines
16: for (var j = 0; j <= canvas.width; j = j + gridPixelSize) {
17: bgContext.beginPath();
18: bgContext.moveTo(j, 0);
19: bgContext.lineTo(j, canvas.height);
20: bgContext.closePath();
21: bgContext.stroke();
22: }
23:
24: bgContext.restore();
25: bgRendered = true;
26: }
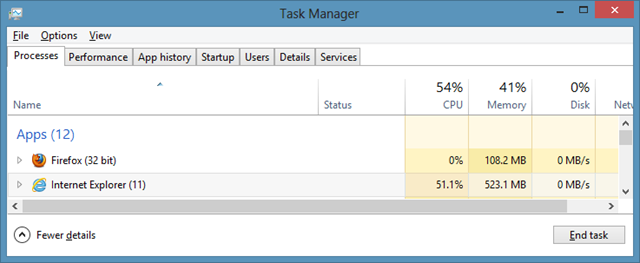
Let’s take a look at the results, shall we? Recall that in our base example, we were seeing around 51% CPU utilization. With this optimization, here’s what Task Manager shows:
Looks like about a 3.3% reduction in CPU utilization. Of course, the CPU number bounces around quite a bit, so it would be wise to record the perf numbers over a longer stretch and average them, but I’m comfortable saying that this optimization does indeed save us some modest load on our processor, so it’s probably worth the small effort needed to add it.
Here’s the full code for this optimization:
Using clearRect
Our next optimization is very easy to implement. We’ll start again with the base implementation, and simply replace the call to canvas.width in the animation loop with a call to clearRect:
1: function animationLoop() {
2: context.clearRect(0, 0, fullWidth, fullHeight);
3: renderGrid(20, "red");
4: // remaining code omitted
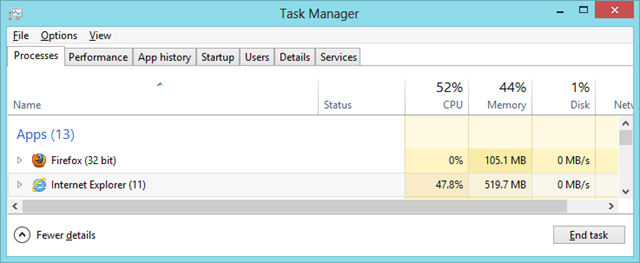
So, how did we do with this optimization?
Ouch! Our CPU utilization actually went up with this change. Given that I’m not recording and averaging, and given that I’m not rigorously controlling what else is running on my machine, it’s possible some of this is unrelated to the change, but that’s still not very promising.
Why might this optimization not be giving us better results, as the article linked at the top suggests? Well, as the author observes, this particular technique is a moving target, and given that setting canvas.width is a pretty common way of clearing the canvas, browser vendors may well optimize for that case, removing the performance benefit of using clearRect. There may still be a good argument for using clearRect, for example if your testing on another browser indicates significant performance benefits. Note also, that while setting canvas.width clears ALL canvas state, clearRect clears the specified are of the canvas, but preserves much of the drawing context state, so depending on how your code is implemented, this may make it worthwhile to use clearRect even if it does not provide a significant performance benefit.
The take-away for this optimization is that you should test it on your target browsers, and see whether it helps before you choose whether to implement it or not.
Using requestAnimationFrame
Our last optimization targets a relatively recent devleopment in the browser world, an API called requestAnimationFrame. The idea behind this API is pretty simple. Using JavaScript’s setTimeout or setInterval functions to create an animation loop has some inherent inefficiencies. Because the loop is not explicitly tied to the refresh rate of the computer’s monitor, the canvas may be redrawn when the user will never see the frame because of the discrepancy between the animation loop and the refresh rate. By having your code ask the browser to manage the animation loop, the browser engine is able to optimize the timing and rendering, resulting in smoother animations with less potential for glitching, and a smaller impact on CPU and battery life.
Applying this optimization would be fairly simple if all browsers supported requestAnimationFrame as a standard. Alas, the W3C specification for requestAnimationFrame is currently a Working Draft, which means that we may be living with vendor-prefixed versions in some browsers for a while yet. That shouldn’t stop us from taking advantage of it, thanks to a simple polyfill from Paul Irish that will use either the standards-based API, if available, or any available vendor-prefixed version, or fall back to using setTimeout. We’ll add this to the top of our JavaScript, before the rest of the code (note that this function is self-executing, so it will run when the JavaScript is loaded):
1: // requestAnimationFrame shim by Paul Irish:
2: // http://paulirish.com/2011/requestanimationframe-for-smart-animating/
3: window.requestAnimFrame = (function(){
4: return window.requestAnimationFrame ||
5: window.webkitRequestAnimationFrame ||
6: window.mozRequestAnimationFrame ||
7: window.oRequestAnimationFrame ||
8: window.msRequestAnimationFrame ||
9: function( callback ){
10: window.setTimeout(callback, 1000 / 60);
11: };
12: })();
Note that the target framerate of requestAnimationFrame is 60fps, which is why the setTimeout fallback is using a value of 1000/60 (or approximately 16.6666666, etc. ms) for the timeout.
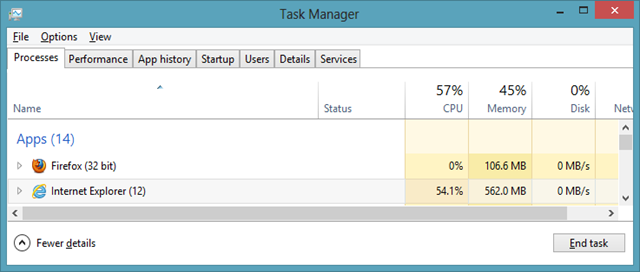
Savvy readers may have noticed that our previous examples used a setTimeout value of 33ms to approximate 30fps, so we were only drawing half as often. For a fair comparison, we should probably use the same setTimeout value for a “before” check on our CPU consumption, which gives us the following:
Not unexpectedly, this bumps up our CPU utilization a bit.
Once we’ve added the polyfill, and run a basic “before” test, we can change the last line of our animation loop to use the updated API, like so:
1: requestAnimFrame(animationLoop);
Note that since requestAnimationFrame automatically attempts to keep a 60fps frame rate, we don’t need to specify the timeout value as an argument, we just pass it the function name that we want executed next, which is of course our animation loop.
So how much does this save us? Is this the awesome optimization we were looking for? Let’s see what Task Manager has to say:
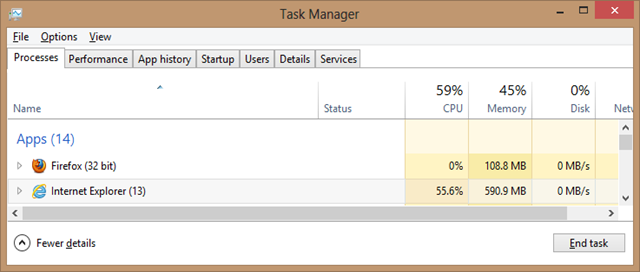
Well…that’s hardly an earth-shattering optimization…or is it? If we go back and run the base version of our code and then minimize the browser, here’s what Task Manager looks like:
That’s close enough to our original value of 55.6% to say that minimizing the browser has no impact on the performance. Which makes sense, if you think about it, because the browser has no way of knowing what we’re doing with setTimeout, so it continues to run, even while the browser is minimized.
And because our original code was running at around 60fps, when the browser is visible we’re doing pretty close to just as much work either way.
Now let’s see what happens with our optimized version…if we run the version that uses requestAnimationFrame and then minimize the browser, we get:
Now THAT is what I call a worthwhile optimization! Because requestAnimationFrame is explicitly for use in animation, the browser can reasonably assume that if your canvas isn’t visible, it doesn’t need to be rendered over and over again. The same is true in Internet Explorer 10 (other browsers may vary, so you should test in all target browsers) whether you minimize the browser, or simply switch to a different tab.
What Have We Learned?
What this experiment shows is that the world of optimizations can change fairly rapidly as new browser versions are released, so you should always test specific optimizations before blindly implementing them. Just because last year someone on the web said it’s better doesn’t mean that advice still applies.
In the case of the 3 optimizations tested here, my rough tests suggest that it’s worthwhile to implement both the background canvas and the requestAnimationFrame optimizations, while the context.clearRect optimization is less clear, and would require some more in-depth testing on other browsers to see if it made sense.
Here’s a fiddle with the code implementing both the background canvas and requestAnimationFrame optimizations:
Just for fun, I tested the code on the most recent release of Mozilla Firefox, and my results were pretty consistent with Internet Explorer 10, both in terms of CPU consumption, and in reduction of CPU consumption when the tab was not visible, from use of requestAnimationFrame. Great way to save CPU cycles when your page isn’t showing.
Summary
Performance optimization is a pretty deep topic, and I’ve just skimmed the surface with this post. It’s also fair to say that my testing methodology is pretty seat-of-the-pants, and that a more rigorous testing framework would provide more accurate results. But there are some clear winners here, particularly the use of requestAnimationFrame, which when supported natively by the browser can dramatically reduce the resources used by canvas animations when the user minimizes the browser or switches to another tab. In a world where more and more web browsing is done on tablets and other mobile devices, this will make for happy users with longer battery life.
If you found this useful, why not tell your friends? You can also subscribe to my RSS feed, and follow me on twitter for more frequent updates.
More parts in the series:
- Part 1 – Introduction
- Part 2 – Basic Shapes
- Part 3 – Paths and Text
- Part 4 – Transformations
- Part 5 – Basic Animation
- Part 6 – Managing Animated Shapes
- Part 7 – Optimizing Animations (this post)
- Part 6 – Managing Animated Shapes
- Part 5 – Basic Animation
- Part 4 – Transformations
- Part 3 – Paths and Text
- Part 2 – Basic Shapes
Comments
Comment by pip010 on 2012-10-09 06:20:00 +0000
Well… what i have learned and many devs start learning is: you can make a donkey be a racing horse 😛
keep the good job of introducing such a new tech as canvas in html!
to all the rest, watch your HYPE steps!
