If you’ve been following along with this series so far, you know we’ve come along way, from my overview of the series, which described the target scenario of a simple leaderboard service for a couple of JavaScript-based Windows 8 games, to the 2-part post (Part 1 / Part 2) on building this service using WCF Data Services, and hosting as an Azure Cloud Service, to the most recent installment, in which I showed how to build the same service using ASP.NET Web API, and hosted in a Windows Azure Web Site.
To round out the group of solutions I’m exploring in the series, in this post I’ll show you how to build the same game leaderboard service on top of the new Windows Azure Mobile Services (in preview as of this writing).
A Different Approach
In both of the previous versions of the leaderboard service, the solution involved a code-based server-side solution. On the plus side, in both cases, Visual Studio did most of the work of creating the code (along with the Entity Framework, WCF Data Services, and Web API libraries), but the end product is a project with source code that needs to be maintained.
By contrast, Windows Azure Mobile Services takes a simpler approach, that allows me as the developer to focus more on my client code, and less on the server side code.
Getting Started
As with my other examples, you’ll need a Windows Azure account to follow along. If you have an MSDN Subscription, check your benefits page, as it may include some Windows Azure benefits. If you don’t have an MSDN subscription, you can sign up for a 90-day trial that will give you everything you need to follow along, and by default includes a spending cap to ensure that you don’t have any out-of-pocket expenses if your services exceed the trial service limits (if your services exceed the trial limits, they’ll automatically be shut down).
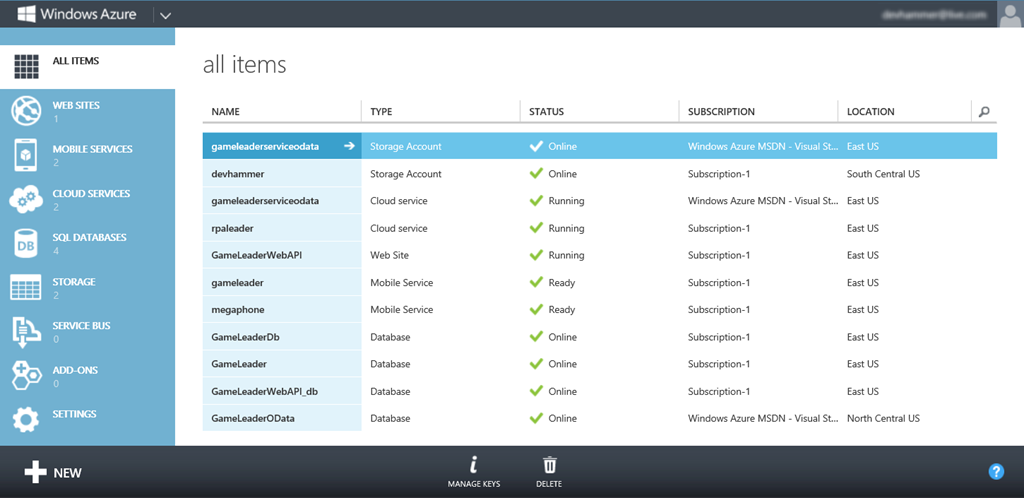
With my Azure account in-hand, I start by signing into the Windows Azure Management Portal, which by default gives me an overview of all of the services I have running in Windows Azure, which includes all subscriptions that are managed by the account I use to log in, as you can see below:
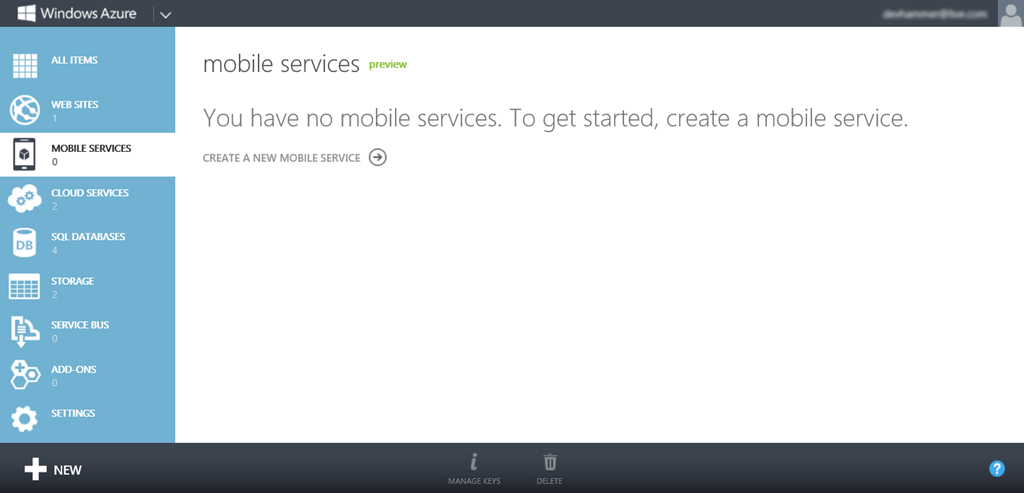
One of the “tabs” along the left side is MOBILE SERVICES, which is just what I’m looking for, so I’ll click that, which takes me to the mobile services home page. I’ve removed a couple of existing services I was working with, so there’s not much to see yet:
I’ll get started by clicking the + NEW link at the bottom (clicking the link in the middle of the page would work, too), which gives me a nice Create option below (and shows neatly where Mobile Services fits in the Azure ecosystem):
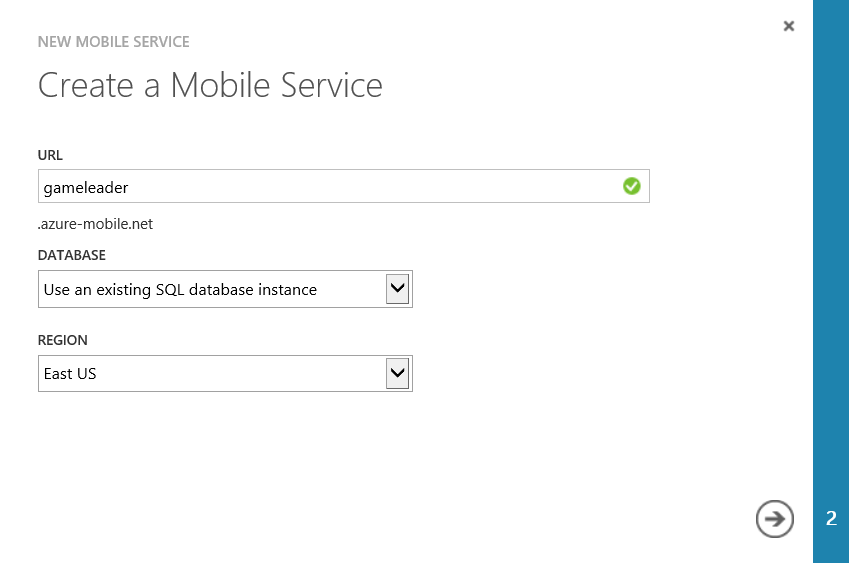
Clicking Create gives me the following 2-step wizard for creating the service (since I already created a database instance in an earlier part of this series, I’ll go ahead and leverage that existing database instance):
Note that the URL must be unique, and the wizard will check the name dynamically and let you know if your desired name is available. For the free version of Mobile Services, all URLs will use the pattern MYSERVICENAME.azure-mobile.net, but I can (at an additional cost) also configure my service to use a custom domain name, once the initial setup is complete. For my purposes, the existing domain name is fine, since end-users won’t be interacting with the service directly.
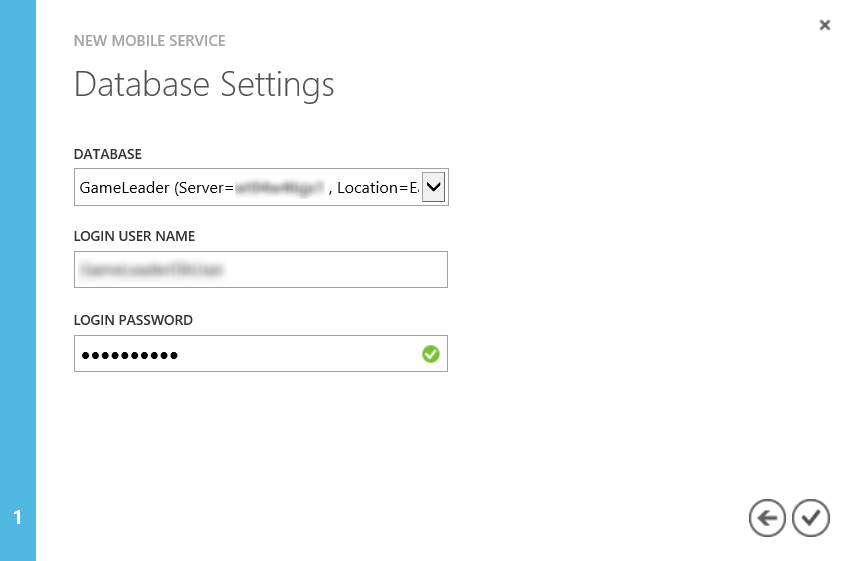
Clicking the arrow icon takes me to the second page of the wizard, where I will provide my database credentials:
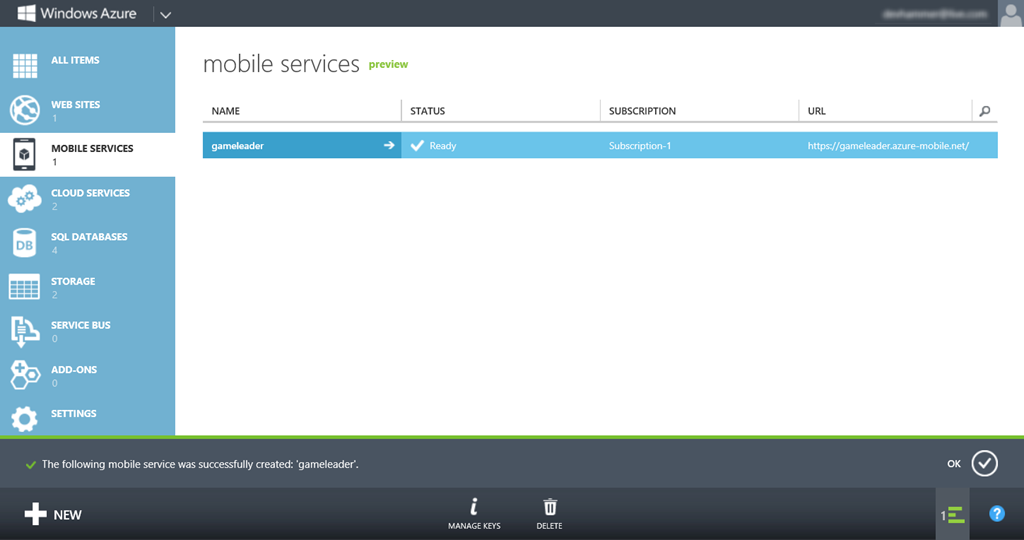
Clicking the checkmark icon will start the process of creating the service, which takes a few minutes. When the service has been set up, I get a screen that looks like the following:
NOTE: Please be aware that while the service URL above is public, I may or may not be keeping it active after this post is complete, so it may not be accessible. If you want to experiment with mobile services, I encourage you to create your own service.
What Have I Done?
OK, so now I have my mobile service. But what does that mean, exactly?
Basically, in a few short steps, I have (with the help of Azure) built out an infrastructure that will provide me with:
- A place to store data
- The ability to create tables and schemas (schemas are dynamic by default…more on that later)
- RESTful services to access the data in any tables I create
- Client libraries to simplify the process of interacting with the back-end data tables
-
Push notification services
- Authentication providers
And for folks who like transparency, the client SDK for Mobile Services is being developed on GitHub, so you can check out the code, fork it, and contribute bug fixes and features as well.
Getting a Quick Start
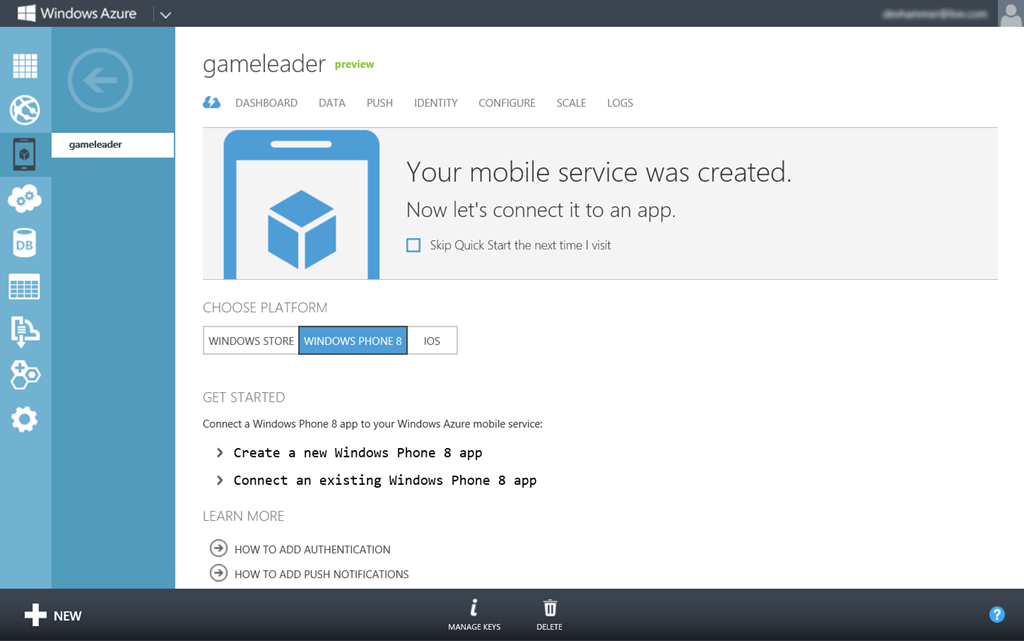
Now that my mobile service is created, I can simply click the name of the service to start working with it. By default, the first screen I’ll see is the Quick Start page, shown below (note the checkbox, which allows me to skip the Quick Start next time):
The Quick Start screen is designed to get users up and running fast with their mobile services, and (as of this writing) supports 3 client platforms out of the box: Windows Store (C# or JavaScript apps), Windows Phone 8, and iOS. Android support has been announced as well.
UPDATE: As of March 2013, support has been added for both Android clients, as well as HTML clients, making Mobile Services an even better solution, no matter what type of client app you’re building.
For each of these client platforms, the Quick Start page provides a tutorial on creating a new app for that platform using the new mobile service, or alternatively, for connecting an existing app to the mobile service. Since my goal is to connect this service to a couple of existing games, that’s what I’ll start with.
Note also that the Quick Start page provides links to instructions for adding authentication and push notifications for each platform (again, I’ll show you how to leverage these features in future posts).
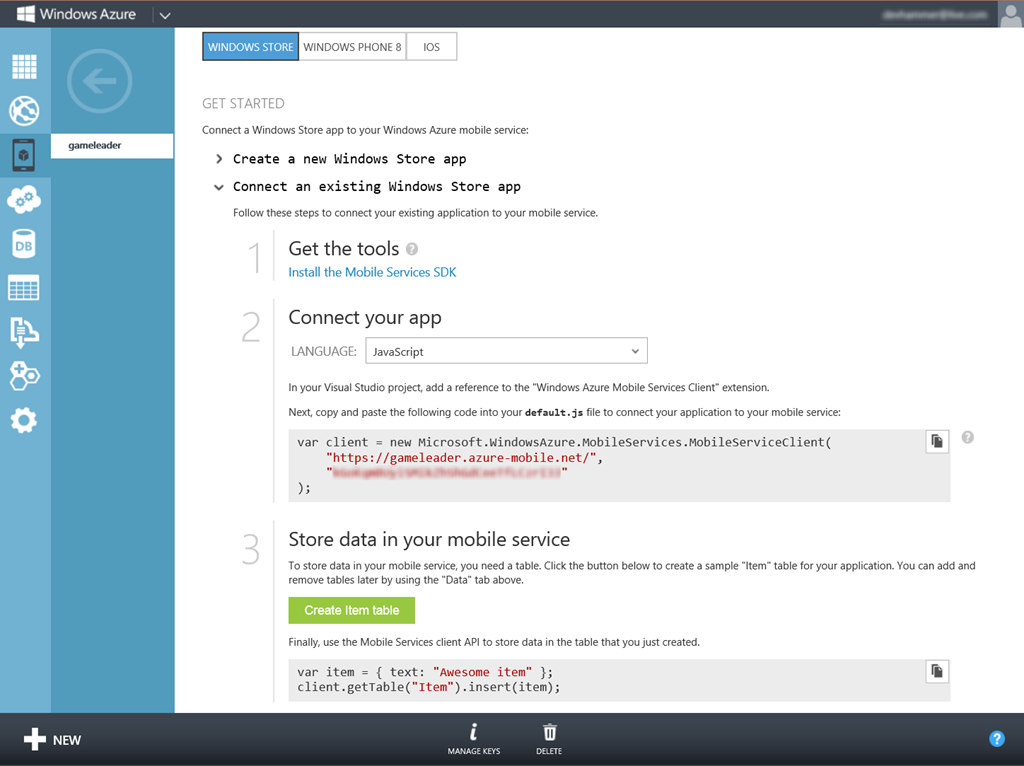
Since I’m going to use my service with a Windows Store app, I’ll switch to the Windows Store plaftorm, then click the heading labeled “Connect an Existing Windows Store app”, which gives me some simple instructions, as shown below:
The first two steps are pretty straightforward, one, installing the Mobile Services SDK, and two, referencing the SDK in my Windows Store app project, and adding the initialization code to the project. The initialization code in step 2 provides the client library with the URL from which to access the service, plus the application key (obfuscated above), which is the default means of authenticating the app to the service and authorizing table access. The Data tab for a given service in the management portal allows more restrictive permissions to be put in place, but I’m going to stick with using the application key for the time being.
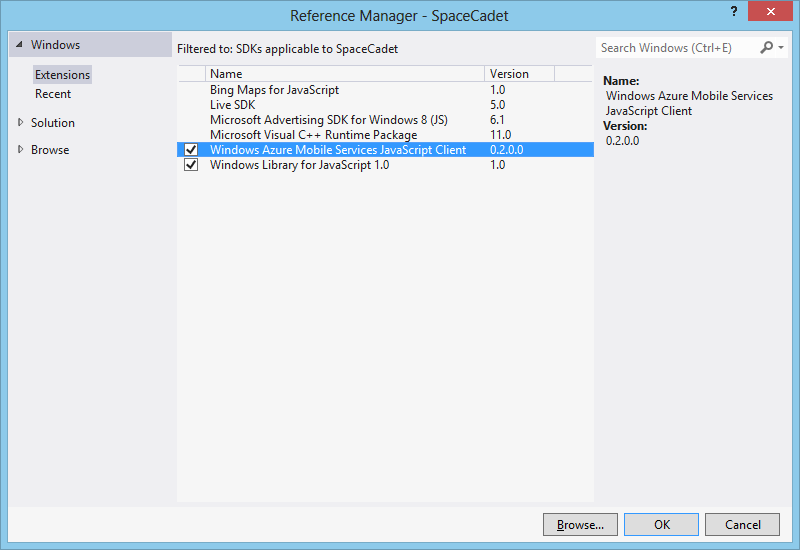
I’ve already got the Mobile Services SDK installed, so let me show you how simple it is to add a reference to the SDK. I’ll open up my Windows Store app (in this case, the Space Cadet game I’ve been using as one of my demo apps throughout this series), and in Solution Explorer, right-click the References node (which you’ll find right below the project node), and select Add Reference… Find the Windows Azure Mobile Services JavaScript Client, and check the checkbox to the left of it, as shown below:
Then click OK to add the reference.
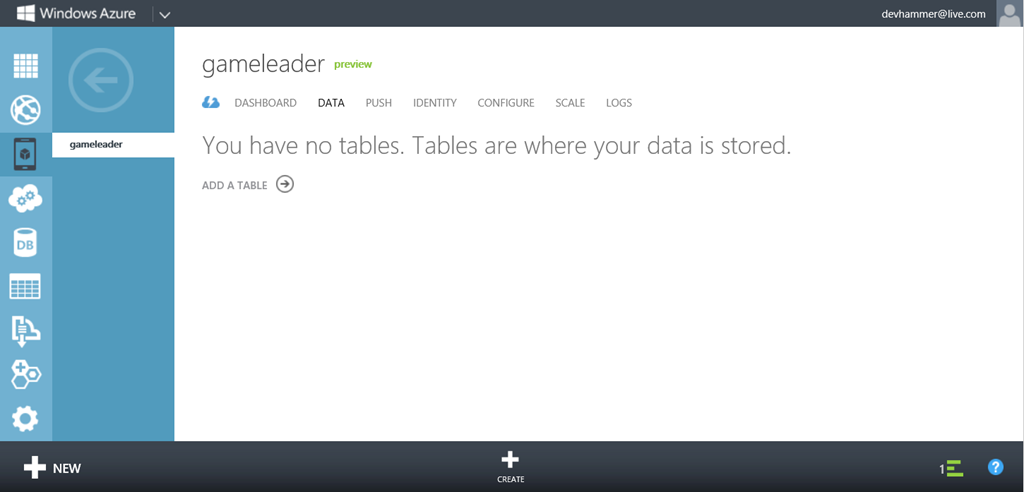
Step 3 in the Quick Start shows the syntax needed to add new items to an Item table, which I can create by clicking the Create Item table button. Alternately, if I want a table with my own name, I can go to the Data tab and add a new table there:
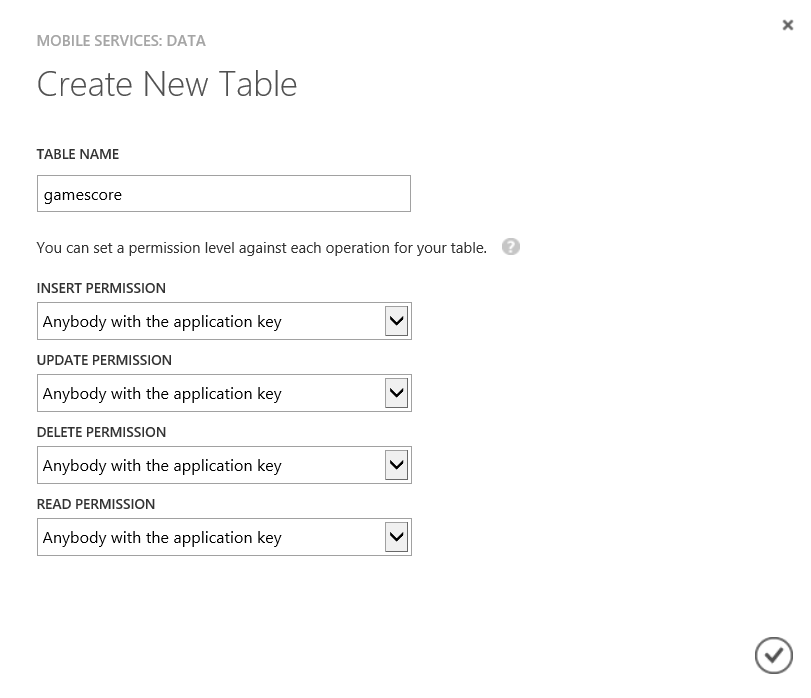
When I click the Add a Table link (or the Create link at the bottom of the page), I’m presented with a dialog that allows me to specify the name of the table, as well as the permissions for the Insert, Update, Delete, and Read permissions:
As noted earlier, the default is to allow anyone with the application key to access these operations on the table. Additional permissions include Everyone, which opens the operation up to anyone who has the service URL (you might use this to provide open access to the read operation, but it would be pretty rare to use this for other operations), Only Authenticated Users, and Only Scripts and Admins. The latter permission means that the table can only be accessed in the management portal and via server-side scripts.
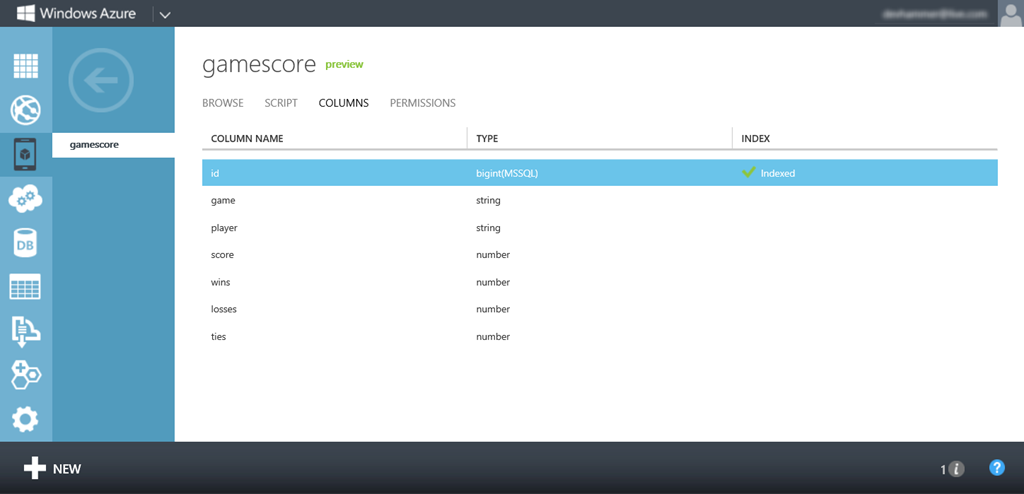
I’ll set my table name to “gamescore,” as shown above, and click the checkmark to create the table. Once the table creation is complete, if I click into the gamescore table, and switch to the Columns tab, I see that there’s only one column defined, called id, and it’s indexed, and of type bigint.
One thing you might notice is that there’s no interface here to add columns. That’s because by default, mobile services use a dynamic schema model, in which anything I add to the named table from my client code will automatically generate the necessary schema on the fly. This provides a very flexible mechanism for storing data, particularly if you don’t know up-front what data you’ll need to store.
Connecting the Client
At this point, I have everything I need on the server side to successfully connect my game to the leaderboard service. The next step is to wire up the client code, and as with the previous examples, I’ll do this by creating a separate JavaScript file that contains all the logic for interacting with the service, and expose this via a defined API using the WinJS.Namespace.define function, just as I did in the previous examples in this series. Let’s take a look at the full code, and I’ll explain the key parts one by one:
leaderboardWAMS.js
1: (function () {
2: "use strict";
3:4: // Leaderboard Client for Windows Azure Mobile Services
5: // by G. Andrew Duthie
6: // This code is copyright © Microsoft Corporation, and licensed under the Microsoft Limited Public License (Ms-LPL).
7: // All rights reserved.
8: // Code is provided AS-IS with no warranties.
9:10: var leaderboardClient, gameScoresTable, leaderboardList, playerName, gameName, diag;
11:12: WinJS.Namespace.define("Leaderboard", {
13: setPlayerName: setPlayerName,14: init: init,15: addWin: incrementWins,16: addLoss: incrementLosses,17: addTie: incrementTies,18: updateScore: updateHighScore,19: getTopTenScores: getTopTenScores,20: getTopTenWins: getTopTenWinLossTie,21: leaderboardList: leaderboardList22: });23:24: // player and game are required for initialization
25: function init(player, game) {
26: return new WinJS.Promise(
27: function (completed, error, progress) {
28: if (player) {
29: playerName = player;30: }31: else {
32: error("Player Name is required for initialization");
33: }34:35: if (game) {
36: gameName = game;37: }38: else {
39: error("Game Name is required for initialization");
40: }41:42: // replace with your custom WAMS instance information
43: var leaderboardClient = new Microsoft.WindowsAzure.MobileServices.MobileServiceClient(
44: "https://YOUR_UNIQUE_SERVICE_NAME.azure-mobile.net/",
45: "YOUR_INSTANCE_KEY"
46: );47: // Replace "gamescore" with your table name, if different
48: gameScoresTable = leaderboardClient.getTable('gamescore');
49: // make sure that the score table has at least one record for the player name / game name combo
50: gameScoresTable.where({ player: playerName, game: gameName })51: .read().done(52: function (results) {
53: if (results.length == 0) {
54: // initialize table
55: var gameScore = {
56: game: gameName, player: playerName, score: 0, wins: 0, losses: 0, ties: 057: };58: gameScoresTable.insert(gameScore);59: };60: completed();61: },62: function (e) {
63: showMessage(e.message);64: });65: });66: }67:68:69: function getCurrentPlayerScore() {
70: return new WinJS.Promise(
71: function (completed, error, progress) {
72: gameScoresTable.where({ player: playerName, game: gameName })73: .read().done(74: function (results) {
75: completed(results[0]);76: },77: function (e) {
78: // handle exceptions
79: showMessage(e.message);80: });81: });82: }83:84: function setPlayerName(name) {
85: var namePromise = getCurrentPlayerScore();
86: namePromise.done(function (currentScore) {
87: if (playerName != name) {
88: playerName = name;89: currentScore.player = playerName;90: gameScoresTable.update(currentScore);91: }92: }, function (e) {
93: showMessage(e.message);94: });95: }96:97: function incrementWins() {
98: var scorePromise = getCurrentPlayerScore();
99: scorePromise.done(function (currentScore) {
100: currentScore.wins++;101: gameScoresTable.update(currentScore);102: }, function (e) {
103: showMessage(e.message);104: });105: }106:107: function incrementLosses() {
108: var scorePromise = getCurrentPlayerScore();
109: scorePromise.done(function (currentScore) {
110: currentScore.losses++;111: gameScoresTable.update(currentScore);112: }, function (e) {
113: showMessage(e.message);114: });115: }116:117: function incrementTies() {
118: var scorePromise = getCurrentPlayerScore();
119: scorePromise.done(function (currentScore) {
120: currentScore.ties++;121: gameScoresTable.update(currentScore);122: }, function (e) {
123: showMessage(e.message);124: });125: }126:127: function updateHighScore(newScore) {
128: var scorePromise = getCurrentPlayerScore();
129: scorePromise.done(function (currentScore) {
130: if (currentScore.score <= newScore) {
131: currentScore.score = newScore;132: gameScoresTable.update(currentScore).done(function () {
133: showMessage("Leaderboard Updated.");
134: });135: }136: }, function (e) {
137: showMessage(e.message);138: });139: }140:141: function getTopTenScores() {
142: return new WinJS.Promise(
143: function (completed, error, progress) {
144: gameScoresTable145: .select("player", "score")
146: .where({ game: gameName })147: .orderByDescending("score")
148: .read().done(149: function (results) {
150: leaderboardList = new WinJS.Binding.List(results);
151: completed(leaderboardList);152: },153: function (e) {
154: // handle exceptions
155: error(e);156: });157: });158: }159:160: function getTopTenWinLossTie() {
161: return new WinJS.Promise(
162: function (completed, error, progress) {
163: gameScoresTable164: .select("player", "wins", "losses", "ties")
165: .where({ game: gameName })166: .orderByDescending("wins")
167: .read().done(168: function (results) {
169: leaderboardList = new WinJS.Binding.List(results);
170: completed(leaderboardList);171: },172: function (e) {
173: // handle exceptions
174: error(e);175: });176: });177: }178:179: function showMessage(msg) {
180: diag = new Windows.UI.Popups.MessageDialog(msg);
181: diag.showAsync();182: }183: })();Here are the important parts of the code:
- Lines 12-22: As with the other examples, this is where I’m defining the externally-facing API for calling the leaderboard code. Because all the code in the file is wrapped by an anonymous self-executing function, nothing that isn’t explicitly exposed can be seen by the outside world.
-
Line 43: Part of the init function, this code initializes the leaderboardClient object, using the URL for the mobile service, along with the application key, using the constructor of the MobileServiceClient object exposed by the Windows Azure Mobile Services JavaScript Client library. Note that you need to supply your own specific URL and application key.
- Line 48-64: In this code, also part of the init function, I get a reference to the gamescore table created earlier, and then query the table using intuitive .where and .read functions. The arguments I pass to the where function limit the data returned to just this game and player. Note the .done function, which indicates that .read returns a WinJS.Promise object, which makes sense, since this is an operation that should be asynchronous. When the .read function returns, I check to see if any records were returned. If not, then I create an object containing the basic schema for my gamescore record, and use the table object reference’s .insert function to add it to the gamescore table, then call the completed function to let the caller of the init function know that we’re done.
So what happened here? Basically, the client library referenced by my app packaged up the data as JSON (which doesn’t really require any work, since I defined it that way in the first place…but it’s good to keep in mind that even if you’re using the managed library in a C# app, the data is transported as JSON), and then called the appropriate REST URL to insert the new record in the table. Since the table did not have a schema defined, mobile services inspected the JSON data, and defined columns capable of supporting the data provided. This is pretty cool, since it allows me the flexibility of defining my schema on the fly in my code. The downside to be aware of, however, is that if you have a typo in your code, mobile services will just as happily create a column using the misspelled column name, which can lead to some fun debugging. For this reason, mobile services allow you to turn off the dynamic schema feature, if you choose. You may want to leave dynamic schema on initially, while you’re defining your schema, then turn it off to avoid accidentally redefining the schema.
OK, back to the code:
- Line 72: This code, similar to that in the init function, calls the table object’s .where and .read functions to get unique records for this player and game (there should only be one record per player/game combo), and returns the resulting object to the calling function using the WinJS.Promise.done function.
- Lines 84, 97, 107, and 117: In each of these functions, I call the getCurrentPlayerScore function, which returns the gamescore record for the current player/game as described above, and depending on what kind of game I’m playing, updates the gamescore table (in order) with a new player name, increments the wins column, increments the losses column, or increments the ties column. In each case, if something goes wrong, I call a helper function to display a message to the user.
-
Line 127: In the updateHighScore function, I again call getCurrentPlayerScore, then check to see if the score in the returned record is less than the new score for the just-finished game. If it is, then I set the score property of the currentScore object to the new score, and call the table object’s .update function to send the updated data to the service. In this case, I also display a message on successful completion, leveraging the fact that the .update method also returns a promise.
- Lines 141 and 160: These two functions, which are used by the leaderboard page, take advantage of some of the rich querying functions of the table object, which allow me to create somewhat LINQ-like queries to select just the columns I want for a given purpose (.select), limit the scope of the data returned (.where) and order the data (.orderByDescending). You can read more about the available functions here. Once I’ve got the results I need, I simply pass them into the constructor of the WinJS.Binding.List object, and pass the resulting list back to the caller, which will use it to bind the data into a ListView control on the leaderboard page.
To make the final connection with the game itself, I simply need to update the script reference in my default.html and leaderboard.html pages, like so:
<script src="/js/leaderboardWAMS.js"></script>
-
- Lines 84, 97, 107, and 117: In each of these functions, I call the getCurrentPlayerScore function, which returns the gamescore record for the current player/game as described above, and depending on what kind of game I’m playing, updates the gamescore table (in order) with a new player name, increments the wins column, increments the losses column, or increments the ties column. In each case, if something goes wrong, I call a helper function to display a message to the user.
-
-
- Client libraries to simplify the process of interacting with the back-end data tables
I also need to reference the MobileServicesJavaScriptClient/MobileServices.js file as well (note that this reference should be BEFORE the reference to my script above):
<script src="/MobileServicesJavaScriptClient/MobileServices.js"></script>
In the case of the leaderboard page, I also need to make sure that the databinding properties in my template match the column names in my table, as these are case-sensitive (lines 4 and 7 below):
1: <div id="myTemplate" data-win-control="WinJS.Binding.Template">
2: <div>
3: <div class="win-type-x-large" style="width: 400px;">
4: <span>Player: </span><em><span data-win-bind="textContent: player"></span></em>
5: </div>
6: <div class="win-type-large">
7: <span>Score: </span><em><span data-win-bind="textContent: score"></span></em>
8: </div>
9: </div>
10: </div>
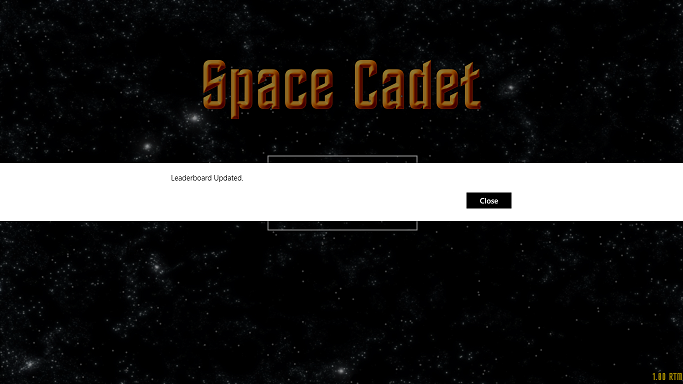
Because the functions exposed in my Leaderboard namespace are the same as in the previous examples, there’s no need to update the game logic at all. Once I’ve updated the script reference, I can simply run the game, and when the game ends, if my score is higher than the existing score, I’ll see the following:
And when I visit the leaderboard page, here’s what I see:
Of course, since I’ve only just created my table, there’s only one score record, but it’s nice to see that it’s working fine.
For good measure, after updating the code for the Catapult Wars game, and playing a couple of games, here’s what my gamescore table data looks like in the management portal:
Wrap-up
In this post, I’ve shown you how easy it is to get started with Windows Azure Mobile Services. Creating a new mobile service and table is fast and simple, and the client libraries provide a quick and intuitive way of wiring your apps up to your mobile service, without worrying about the underlying REST calls.
In fact, simply by switching my leaderboard service over to Windows Azure Mobile Services, I was able to reduce the size of my leaderboard JavaScript library by nearly 30%. That’s a significant reduction in code, nearly all of which is due to the simpler code required thanks to the client library.
But the cool part is that it’s all still just RESTful services under the covers. So if I was building an app on a platform for which Windows Azure Mobile Services does not yet provide a client library (for example, Android, or even a web site), as long as that platform can make HTTP calls, I can still leverage mobile services as a back-end. You can read all about the Windows Azure Mobile Services REST API here.
Here are the advantages and disadvantages, in my view, of using Windows Azure Mobile Services for this kind of service:
Advantages
- Quick to Develop – Setting up a mobile service and data tables takes little time at all, and thanks to the client libraries and dynamic schema capability, you can easily have a basic service up and running and connected to your app in a matter of minutes.
- Integration – In addition to the back-end data and REST services explored in this post, mobile services can also provide authentication against a variety of identity providers (as of this writing, Microsoft Accounts, Google Accounts, Twitter, and Facebook), as well as send push notifications. I’ll explore these features in future posts.
-
Query flexibility – The mobile services client libraries provide intuitive query functionality, making it easy to filter and sort data. As I showed above, the JavaScript client library does this via chainable function calls.
- Scalable – Windows Azure Mobile Services lets you start off small (and inexpensive) with a Shared service mode, and in the preview period, you can have up to 10 services in shared mode for free, all running on a single SQL Database instance. This keeps costs low, but when demand for your service grows, you can move to Reserved mode, and have your service running multiple instances to support many users.
Disadvantages
-
Preview Service – At the time of this writing, Windows Azure Mobile Services is in preview mode. This means that parts of the platform are still in development, and there is no SLA offered for the preview period.
- Limited support for server-side validation – One feature I did not have time to discuss in depth is mobile services support for server-side scripts (using JavaScript running in node.js). For each operation, on each table, you can have your mobile service execute JavaScript code. This is useful when you want to take specific actions. For example, when a new record is inserted in a table, you might want to send a push notification. You can also use these server-side functions to provide some basic input validation, but at the time of this writing this requires you to write all of the code for this validation. This is an area where some of the other technologies I discussed have an advantage, in that in many cases you can simply decorate your model classes with the appropriate metadata attributes, and client code will do the validation for you.
Ultimately, which of these three technologies is best for you will depend on your experience, and where you want to focus your time.
For Review
If you haven’t already, I highly recommend that you read the rest of the posts in this series:
- Building Data and Services for Windows 8 Apps: Overview
- Building Back-end Data and Services for Windows 8 Apps: OData – Part 1
- Building Back-end Data and Services for Windows 8 Apps: OData – Part 2
-
Building Back-end Data and Services for Windows 8 Apps: ASP.NET Web API
- Building Back-end Data and Services for Windows 8 Apps: Windows Azure Mobile Services (this post)
What’s Next?
In future installments of this series, I’ll explore adding authentication and push notifications to my leaderboard service, using Windows Azure Mobile Services. I’ll be taking some time off for the Christmas holiday, so expect the series to continue in early January.
While you’re waiting, why not sign up for Generation App? There are lots of great resources available for building Windows 8 apps (and now for Windows Phone 8 as well), including new information on a variety of app frameworks from partners that make it fast and easy to build apps and games for Windows 8. It’s free, and you control how often updates are sent, so there’s no good reason to pass it up. Sign up now!
-
- Building Back-end Data and Services for Windows 8 Apps: OData – Part 2
- Building Back-end Data and Services for Windows 8 Apps: OData – Part 1
-
- Integration – In addition to the back-end data and REST services explored in this post, mobile services can also provide authentication against a variety of identity providers (as of this writing, Microsoft Accounts, Google Accounts, Twitter, and Facebook), as well as send push notifications. I’ll explore these features in future posts.
- RESTful services to access the data in any tables I create
- The ability to create tables and schemas (schemas are dynamic by default…more on that later)
