In previous installments of this series, I’ve shown how you can quickly create REST-based services accessible via HTTP that allow you to easily store and retrieve data in a Windows Store app, using several different approaches including WCF Data Services, ASP.NET Web API, and the new Windows Azure Mobile Services. You can read all of the previous parts of the series here. I recommend reading the intro post and the post on Windows Azure Mobile Services at a minimum, so you’re familiar with the games I’m using to demonstrate the concepts in the series, and with the basics of mobile services.
Authentication – Advantage: Windows Azure Mobile Services
As I noted in the post demonstrating Windows Azure Mobile Services, there are a couple of features in Windows Azure Mobile Services (hereafter, WAMS or Mobile Services) that make it well-suited for building back-ends for mobile apps (including Windows Store apps), and provide significant advantages in getting your app working quickly, and providing additional needed services. In the most recent post in this series, I showed how to use the built-in support for push notifications. In this post, I’ll explore the built-in support for authentication.
Who Are You?
Authentication answers the question “who are you?” Its purpose is to identify the user. In order for authentication to be useful, we need to have some trusted source for the user’s identity. In a web application, this might be a custom database of usernames and passwords for users who have registered on our site. While we could do the same with apps, the challenge we’d face is that many users today are resistant to creating a new account for each app or web site they use, so if we force them down that path, they may decide to simply uninstall our app and move on to another one that makes fewer demands on them.
So what’s an app developer to do? Well, thanks to Mobile Services, you have access to a number of built-in providers for authentication information, and you can choose which ones you want to trust for your app’s authentication purposes. The current version of Mobile Services as of this writing has support for 4 authentication providers: Microsoft Account (naturally), Twitter, Facebook, and Google.
Since the majority of app users are likely to have one or more of these accounts, you can make it much easier on yourself (and your users) by leveraging one or more of these providers for your app. And Mobile Services makes it easy to do.
Let’s take a look at how to add support for identifying users based on their Twitter accounts, so we can use their Twitter name as the player name in Space Cadet.
The Overview
The high-level steps for adding authentication to a mobile service (and its clients) are as follows:
- Obtain the necessary key/secret from the provider you wish to use. In the case of Twitter, you can get this by creating an app at https://dev.twitter.com/apps
- Copy the values for the key and secret to the appropriate fields in the Identity tab of your mobile service.
-
Restrict permissions as desired at the table level, using the desired table’s Permissions tab.
- Add authentication to the client app by calling the login function of the mobile service client.
-
- Copy the values for the key and secret to the appropriate fields in the Identity tab of your mobile service.
The Walkthrough
Here are the necessary steps in detail:
- Visit https://dev.twitter.com/apps (instructions for this step for Facebook, Google, and Microsoft Account are available in the mobile services documentation), and log in with the desired Twitter account (if you don’t have an account, you can register for one on the site…you will need to confirm your email address before you can move on to the next step).
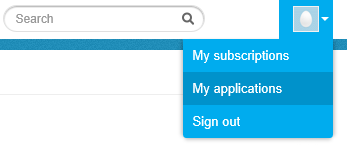
- If you’re not already on the My applications page, from the drop-down in the upper right (where your Twitter avatar is), select “My applications” as shown below:

- If you don’t already have one that you’d like to use, click the “Create a new application” button, and fill out the following fields:
- Name – the name of the application, which will be shown in authorization screens
- Description – text description of the app, which will also be shown to the user
- Website – URL to a public-facing website with more info about your app. This could be your main website, or a link to your app’s online store URL.
- Callback URL – URL for the mobile service you’re using (i.e. http://_MYAPPNAME_.azure-mobile.net).
- Website – URL to a public-facing website with more info about your app. This could be your main website, or a link to your app’s online store URL.
- Description – text description of the app, which will also be shown to the user
- Name – the name of the application, which will be shown in authorization screens
- Read through the terms of service, check the “Yes, I agree” box (assuming you do), and then click the “Create your Twitter application” button.
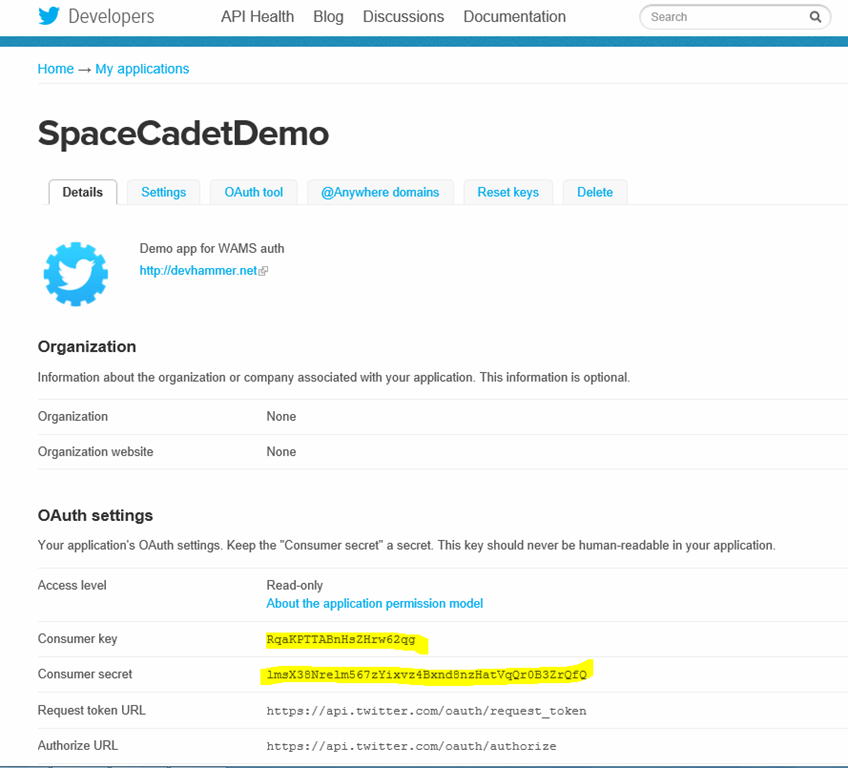
- You’ll be redirected to a page that looks something like the following…note the highlighted Consumer key and Consumer secret fields:

- Open the Windows Azure Management portal, log in, and open the mobile service you want to add authentication to.
- Switch to the Identity tab of the mobile service, and paste in the Twitter key and secret to the appropriate fields on the page, and click the Save button at the bottom of the page. IMPORTANT: Treat the Consumer secret as you would a password. Do not share it or post it publicly, and do not use this value in client-side code.
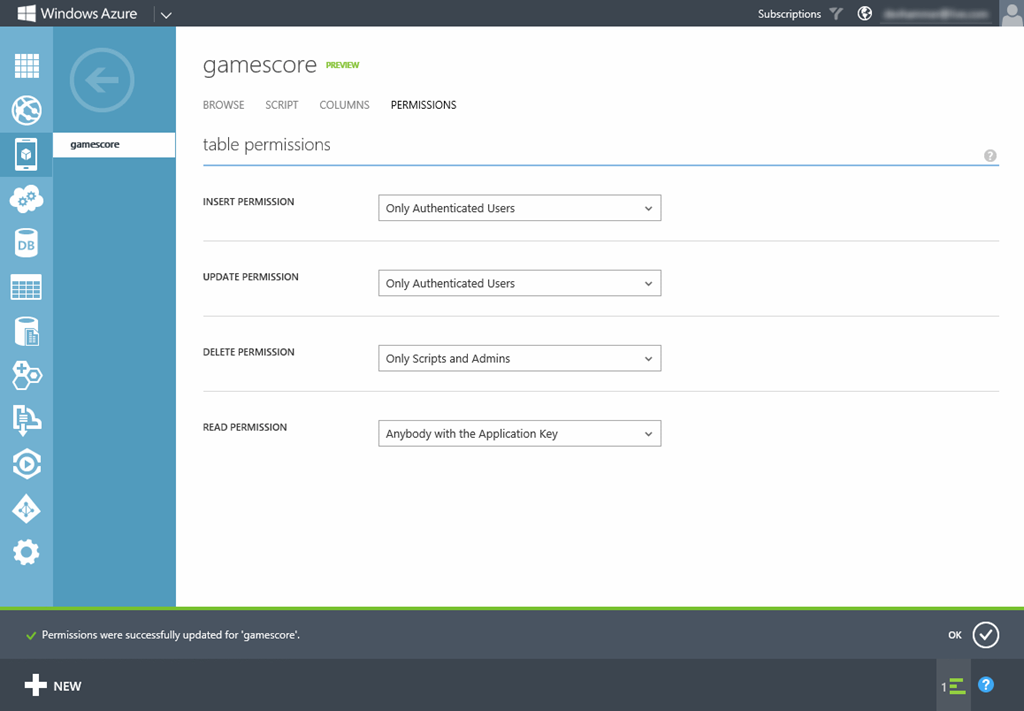
- To prevent unauthenticated users from performing specific operations on the mobile service, switch to the Data tab, click the desired table (in my case, the gamescore table, and click the Permissions tab. The default permissions for a table for each operation is “Anybody with the Application Key” which means any client that has been configured with the correct application key (you can get your application key from the Configure area of the mobile service, using the Manage Keys button at the bottom of that page). Let’s assume we want to limit inserts and updates to authenticated users, and prevent deleting of data to anyone but scripts and administrators. To do so, we change the permissions on the table as follows, and click Save:

The above changes provide authorization for authenticated users to insert or update records, while unauthenticated users are only authorized to read records. At this point, if we run the Space Cadet game project (the same one used in the most recent post in this series), we’ll get an exception when the game attempts to update the leaderboard, because the client is no longer authorized to update the data without authentication. Since the demo project doesn’t have a global exception handler, if we’re debugging, the error will show up in the terminateAppHandler function in base.js, as shown below:

The solution for this is simple…add code to enable authentication.- In my leaderboardWAMS.js file, I’m going to add a variable called userId to the declarations at the top of the file, and just below the code that initializes the mobile service, I’ll place a call to the login function, specifying that I want to login with Twitter:
1: // existing code to initilize the mobile service client
2: leaderboardClient = new Microsoft.WindowsAzure.MobileServices.MobileServiceClient(
3: "https://gameleaderwams.azure-mobile.net/",
4: "dZiAISmMtUyaytLCCsBtWNrwoHKDkI39"
5: );6:7: // Login with Twitter, and don't process additional
8: // initialization code until the authentication is complete
9: leaderboardClient.login("twitter").done(function (result) {
10: userId = result.userId;11:12: // Replace "gamescore" with your table name, if different
13: gameScoresTable = leaderboardClient.getTable('gamescore');
14: // make sure that the score table has at least one record for the player name / game name combo
15: gameScoresTable.where({ player: playerName, game: gameName })16: .read().done(17: function (results) {
18: if (results.length == 0) {
19: // initialize table
20: var gameScore = {
21: game: gameName, player: playerName, score: 0, wins: 0, losses: 0, ties: 022: };23: gameScoresTable.insert(gameScore);24: };25: completed();26: },27: function (e) {
28: showMessage(e.message);29: });30: });-
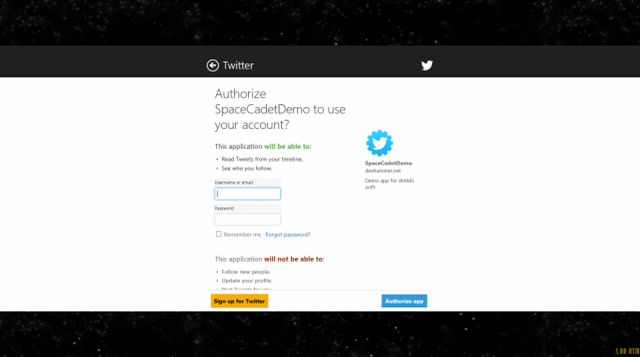
Now if we run the game again, the mobile service client will automatically invoke the correct APIs to prompt the user for Twitter login, as shown below:

- If we fill in valid credentials, click Authorize app, and then play the game and get a new high score, the game will again be able to successfully update the leaderboard with the new high score.
-
- In my leaderboardWAMS.js file, I’m going to add a variable called userId to the declarations at the top of the file, and just below the code that initializes the mobile service, I’ll place a call to the login function, specifying that I want to login with Twitter:
- To prevent unauthenticated users from performing specific operations on the mobile service, switch to the Data tab, click the desired table (in my case, the gamescore table, and click the Permissions tab. The default permissions for a table for each operation is “Anybody with the Application Key” which means any client that has been configured with the correct application key (you can get your application key from the Configure area of the mobile service, using the Manage Keys button at the bottom of that page). Let’s assume we want to limit inserts and updates to authenticated users, and prevent deleting of data to anyone but scripts and administrators. To do so, we change the permissions on the table as follows, and click Save:
- Switch to the Identity tab of the mobile service, and paste in the Twitter key and secret to the appropriate fields on the page, and click the Save button at the bottom of the page. IMPORTANT: Treat the Consumer secret as you would a password. Do not share it or post it publicly, and do not use this value in client-side code.
- Open the Windows Azure Management portal, log in, and open the mobile service you want to add authentication to.
- You’ll be redirected to a page that looks something like the following…note the highlighted Consumer key and Consumer secret fields:
- If you don’t already have one that you’d like to use, click the “Create a new application” button, and fill out the following fields:
- If you’re not already on the My applications page, from the drop-down in the upper right (where your Twitter avatar is), select “My applications” as shown below:
A Note About the Client
You might have noticed that on line 10 of the code above, we save the value of the userId returned as a result of the login call. While you can use that value for convenience sake, do not assume that it is valid if you send it back to the server. Client data and code should always be treated as suspect, because a determined person can potentially falsify that data and attempt to call your service outside of the normal workflow of your app. While there are mitigation techniques in place in Windows Store apps to make this harder, any client application that sends data to a server is subject to similar concerns.
Fortunately, mobile services provides a user object on the server side that is available for each request, as part of the Scripts tab on each mobile services table. That user object includes (among other things) a userId property which will contain the user ID provided by the configured authentication provider, assuming the user has authenticated successfully (otherwise, the value of this property will be undefined).
You could use this property to validate a userID supplied by client code for a given request, or simply use it as the canonical user ID value in your operations. Here’s an example of using the Update script to log the userID of the user making the update request:
1: function update(item, user, request) {
2: console.log("updated score record for: " + user.userId);
3: request.execute();
4: }
request.execute() is the default code for each server-side script operation, so the relevant code here is line 2, which calls console.log to save the user ID information. This information can then be reviewed on the Logs tab in the root of the mobile service, as shown below:
Notice that the log above includes results for both authenticated and unauthenticated users.
Wrap-up
In this post, I’ve shown you how I quick and easy it is to authenticate users against a third-party provider using Windows Azure Mobile Services. Once you’ve configured the proper app credentials, the mobile services client takes care of all the heavy lifting of making the appropriate API calls for the app platform you’re working with, and returns the user ID and the auth token from the configured service.
You can explore more about authentication in Windows Azure Mobile Services here.
For Review
If you haven’t already, I highly recommend that you read the rest of the posts in this series:
- Building Data and Services for Windows 8 Apps: Overview
- Building Back-end Data and Services for Windows 8 Apps: OData – Part 1
- Building Back-end Data and Services for Windows 8 Apps: OData – Part 2
- Building Back-end Data and Services for Windows 8 Apps: ASP.NET Web API
- Building Back-end Data and Services for Windows 8 Apps: Windows Azure Mobile Services
-
Building Back-end Data and Services for Windows 8 Apps: Adding Push Notifications
- Building Back-end Data and Services for Windows 8 Apps: Adding Authentication (this post)
What’s Next?
In the next installment of this series, I’ll look at how we can get some additional information about our authenticated user from the configured identity provider, as well as explore how we can use the Live Connect service for single-sign on. I’m also working on a series of episodes of Microsoft DevRadio in which I’ll be discussing the concepts of this series, and doing some demos, with my colleagues Brian Hitney and Peter Laudati. I’ll post links to the shows once they’re available.
-
- Building Back-end Data and Services for Windows 8 Apps: Windows Azure Mobile Services
- Building Back-end Data and Services for Windows 8 Apps: ASP.NET Web API
- Building Back-end Data and Services for Windows 8 Apps: OData – Part 2
- Building Back-end Data and Services for Windows 8 Apps: OData – Part 1
Comments
Comment by Vishnu Prasanth on 2015-02-04 07:12:00 +0000
What’s the most economical and easy way to develop back-end services for a Windows Phone app?. I see Azure is expensive the more API calls make. For e.g:, for an Instant messaging App service like whatsapp, which back-end would you suggest?.
Comment by devhammer on 2015-02-04 13:51:00 +0000
There are many ways you could host back-end services. You could develop your back-end using ASP.NET Web API and host in any web hosting service. You could use Azure Mobile Services, as described in this post.
The reality is that for an app that requires a minimum level of reliability, you’re going to need to spend some money. So a key piece of the process of coming up with your app idea is thinking about monetization. Whether through direct purchase of the app, or via advertising, or some other means, you’ll need to have a strategy for how your app will make money.
Without monetization, you’ll have no revenue with which to cover your hosting costs, which will exist regardless of where you put your back-end (yes, there are free hosting options available, but I would not consider them for hosting an app back-end, due to reliability concerns).
With an adequate monetization strategy, Azure Mobile Services could be a pretty reasonable solution, since your revenue would likely grow as your API calls increase.
Hope that helps.
Comment by Vishnu Prasanth on 2015-02-05 11:40:00 +0000
Thank you. This is quite a nice explanation; You even answered questions I did not know how to put.
Comment by devhammer on 2015-02-05 11:51:00 +0000
It’s my pleasure. Thanks for visiting. Glad you found the information valuable.
