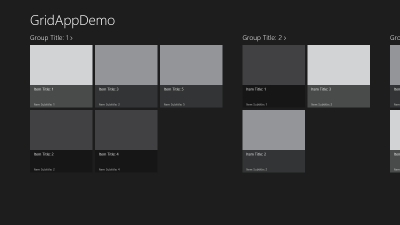
One of the things that I like about building Windows Store apps using Visual Studio 2012 is the availability of several rich and useful templates. One of my favorites is the Grid App template, which demonstrates how to build an app with a hub page listing grouped items in a ListView control, a group details page, listing information about each group, and an item details page, for information about specific items.
 I chose to use the Grid app template in my MeetupPOI Starter Kit for my team’s API Mashup Starter Kits collection. You can download the whole set of starter kits here, or browse our Github site to grab individual starter kits. The starter kits are a work in progress, but each demonstrates the use of one or more APIs in a Windows Store app, and there are kits for both XAML/C# and HTML/JavaScript available. The remainder of the post discusses the first step in creating the starter kit, moving from sample data to live data from an API, in my case, the Meetup.com API.
The Grid app template works out of the box, thanks to the use of some simple sample data, which is created dynamically by the file data.js. This provides a nice example of abstracting the actual data functionality from your markup and script for your particular page, which is a good practice to follow.
One of the advantages of the abstraction provided by data.js is that you can go from sample data to live data with a few simple steps, thanks in part to the dynamic nature of JavaScript.
The data.js file may seem a little tricky to understand at first, so it may be worthwhile to take a look at some of the important points in data.js, and explain what they do.
##
Understanding Data.js
Some of the functions in data.js are pretty straightforward. For example, towards the end of the file, you’ll find a function called generateSampleData which, unsurprisingly, generates sample data as JavaScript objects, first creating an object representing the groups, then creating an object representing the items, associating each of the items with a particular group. So far, so good.
But how does generateSampleData get called? Well, like many of the built-in JavaScript files in the app templates you’ll use with Visual Studio, this file uses the immediately invoked function expression pattern, like so:
1: (function () {
2: // code in here is executed when the JavaScript file is loaded
3: })();
So at the time that the app loads data.js (which is referenced in default.html, which is the first page loaded by the app), the code in data.js creates a new WinJS.Binding.List object (which is the object used to bind data to a ListView control), sets up functions for grouping the items, and then calls generateSampleData, and then uses forEach to iterate over the resulting JavaScript data, and adding each item to the binding list.
Once that’s done, the data is ready to go. Because all this code is inside the IIFE function, it’s not visible to the outside world by default, so the next section of code takes care of that, by setting up a namespace and providing public names by which the grouped items, the groups, and various helper functions, can be accessed from outside data.js:
1: WinJS.Namespace.define("Data", {
2: items: groupedItems,
3: groups: groupedItems.groups,
4: getItemReference: getItemReference,
5: getItemsFromGroup: getItemsFromGroup,
6: resolveGroupReference: resolveGroupReference,
7: resolveItemReference: resolveItemReference
8: });
For the ListView control on the main page of the grid app template (groupedItems.html), the ListView is connected to the data via the following line from groupeditems.js:
1: listView.itemDataSource = Data.items.dataSource;
Bringing in Live Data
So how hard (or easy) is it to bring in live data with as little disruption as possible to the rest of the codebase? Pretty easy, it turns out, and I’ll show you, using the Meetup.com API (you’ll need to get your own API key if you want to try this).
We’re going to modify the existing data.js, so if you want to compare the two later, you may want to make a copy of the file before modifying it. Of course, if you’ve not done so already, you should start by opening Visual Studio 2012 (the free Express version for Windows 8 apps will do fine), and creating a new app based on the Grid app template.
Follow these steps to bring in live data from the Meetup.com API:
- Open up data.js and delete lines 10-14 (the code that calls generateSampleData and iterates over the results):
<strike> 1: // TODO: Replace the data with your real data.</strike>
<strike> 2: // You can add data from asynchronous sources whenever it becomes available.</strike>
<strike> 3: generateSampleData().forEach(function (item) {</strike>
<strike> 4: list.push(item);</strike><strike> 5: });</strike>and lines 57-125 (the generateSampleData function itself…some code truncated or omitted for brevity):
<strike> // Returns an array of sample data that can be added to the application's</strike><strike> // data list. </strike><strike> function generateSampleData() {</strike><strike> var itemContent = "<p>Curabitur class...";</strike>
<strike> var groupDescription = "Group Description: Lorem ipsum ...";</strike>
<strike> </strike>
<strike> // These three strings encode placeholder images. You will want to set the</strike><strike> // backgroundImage property in your real data to be URLs to images.</strike><strike> var darkGray = "data:image/png;base64,iVBORw0KG...";</strike>
<strike> var lightGray = "data:image/png;base64,iVBORw0KG...";</strike>
<strike> var mediumGray = "data:image/png;base64,iVBORw0KG...";</strike>
<strike> </strike>
<strike> // Each of these sample groups must have a unique key to be displayed</strike><strike> // separately.</strike><strike> var sampleGroups = [</strike><strike> { key: "group1", title: "Group Title: 1", subtitle: "Group Subtitle: 1", backgroundImage: darkGray, ... },</strike><strike> /// code omitted...</strike><strike> { key: "group6", title: "Group Title: 6", subtitle: "Group Subtitle: 6", backgroundImage: darkGray, ... }</strike><strike> ];</strike>
<strike> </strike>
<strike> // Each of these sample items should have a reference to a particular</strike><strike> // group.</strike><strike> var sampleItems = [</strike><strike> { group: sampleGroups[0], title: "Item Title: 1", subtitle: "Item Subtitle: 1", ... backgroundImage: lightGray },</strike><strike> /// code omitted...</strike><strike> { group: sampleGroups[5], title: "Item Title: 8", subtitle: "Item Subtitle: 8", ... backgroundImage: lightGray }</strike><strike> ];</strike>
<strike> </strike>
<strike> return sampleItems;</strike><strike> }</strike>
- Add a function at the end of data.js (just before the very last line) called getUpcomingMeetups, like so:
1: function getUpcomingMeetups() {
2: meetupUrl = "http://api.meetup.com/2/open_events?text_format=plain"
3: + "&and_text=False"
4: + "&limited_events=False"
5: + "&desc=False"
6: + "&offset=0"
7: + "&status=upcoming"
8: + "&country=us"
9: + "&sign=true"
10: + "&city=" + [CITY_FOR_SEARCH]
11: + "&state=" + [STATE_FOR_SEARCH]
12: + "&page=" + "200"
13: + "&key=" + [YOUR_MEETUP_KEY]
14: + "&radius=" + "50"; // or your preferred value
15:16: // execute request to the Meetup API
17: WinJS.xhr({ url: meetupUrl, responseType: "json" }).done(function (d) {
18: var meetups = JSON.parse(d.responseText).results;
19:20: meetups.forEach(function (item) {
21: if (item.distance < 5) {
22: item.group.key = "0_5";
23: item.group.title = "Less than 5 mi";
24: item.group.subtitle = "Meetups less than 5 miles from " + [SEARCH_LOCATION];
25: }26: else if (item.distance >= 5 && item.distance < 10) {
27: item.group.key = "5_10";
28: item.group.title = "5 to 10 mi";
29: item.group.subtitle = "Meetups between 5 and 10 miles from " + [SEARCH_LOCATION];
30: }31: else if (item.distance >= 10 && item.distance < 25) {
32: item.group.key = "10_25"
33: item.group.title = "10 to 25 mi";
34: item.group.subtitle = "Meetups between 10 and 25 miles from " + [SEARCH_LOCATION];
35: }36: else {
37: item.group.key = "gt_25"
38: item.group.title = "More than 25 mi";
39: item.group.subtitle = "Meetups more than 25 miles from " + [SEARCH_LOCATION];
40: }41: item.group.description = item.group.subtitle;42: item.title = item.name;43: item.content = item.description;44: //item.backgroundImage = "../../images/meetupBadge.svg";
45: //item.group.backgroundImage = "../../images/meetupBadge.svg";
46: if (item.venue) {
47: item.subtitle = item.venue.city + ", " + item.venue.state;
48: list.push(item);49: }50: });51: },52: function (e) {
53: // handle errors
54: });55: }- Add a line of code at the top of data.js to call the function you just added, like so:
1: getUpcomingMeetups();
- Add a line of code at the top of data.js to call the function you just added, like so:
- Add a function at the end of data.js (just before the very last line) called getUpcomingMeetups, like so:
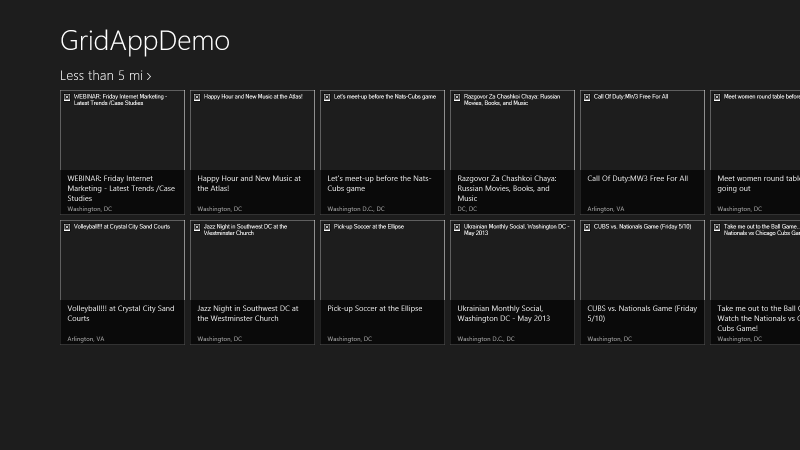
If you run the project now (after replacing the placeholders in brackets with valid values), you’ll get the following output:

As you can see, our data shows up, it’s already grouped, and if you click or tap either the group heading, or an individual item, you’d see that the data carries through to the group detail and item detail pages of the Grid app template as well. It’s not pretty, since
Understanding the Code
OK, so we can see that it works, but what’s actually going on under the covers? Well, the Grid app template home page (groupedItems.html) uses a ListView control that is databound to the instance of WinJS.UI.Binding.List created in data.js. For every item in the list, it renders the markup from an ItemTemplate defined in groupedItems.html. Here’s what the item template looks like:
1: <div class="itemtemplate" data-win-control="WinJS.Binding.Template">
2: <div class="item">
3: <img class="item-image" src="#" data-win-bind="src: backgroundImage; alt: title" />
4: <div class="item-overlay">
5: <h4 class="item-title" data-win-bind="textContent: title"></h4>
6: <h6 class="item-subtitle win-type-ellipsis" data-win-bind="textContent: subtitle"></h6>
7: </div>
8: </div>
9: </div>
As you can see, it’s just ordinary markup, with the exception of the data- attributes. The first one (data-win-control) tells Windows (the WinJS library, actually) to treat this section of markup as a WinJS.Binding.Template instance, while the data-win-bind attributes tells the WinJS databinding logic how to match up attributes from the element (for example src for the img element) with the property on the target element to be databound.
Why is this important? Because it turns out that thanks to the dynamic nature of JavaScript, we can fool WinJS into thinking that the object returned from our API call actually has the properties that the template is looking for, even if they don’t actually exist!
If we go back up to the code for the getUpcomingMeetups function above, here’s what’s happening, section by section:
- Lines 2-14: These lines construct the request URL for the API request to Meetup.com. In the example, I’m using the Open Events API, which is documented here. The parameters are pretty straightforward, and the result is JSON text containing the information on matching events.
- Line 17: This line is where we make the call to the API, using the WinJS.xhr function. This function is simply a wrapper around the xmlHttpRequest browser function, and returns a Promise object rather than requiring a callback function. So when the request has completed, the anonymous function passed to the .done method will be executed. The use of promises can make your code more readable.
-
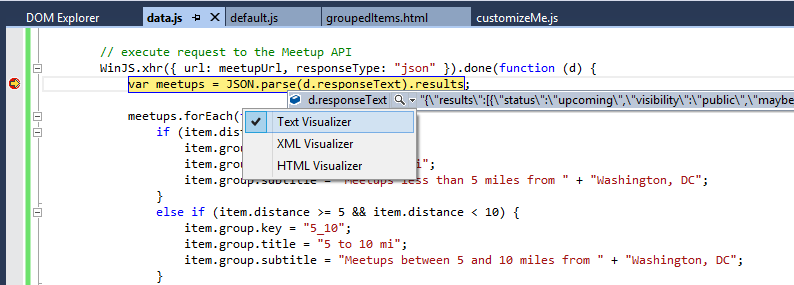
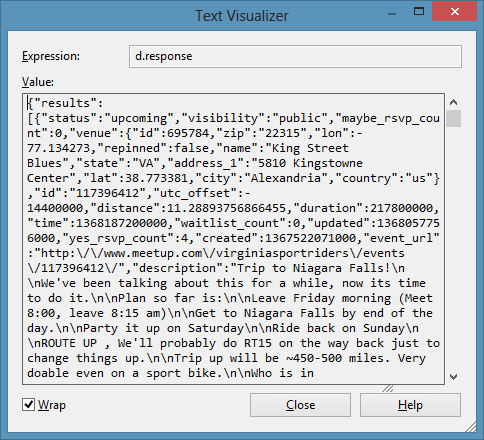
Line 18: Here, we grab the responseText property from the object returned by the xhr request (d), and call JSON.parse to rehydrate the data into JavaScript objects. If you’re using an API and aren’t sure what the data will look like, you can place a breakpoint on this line, and when the breakpoint is hit, use the built-in text visualizer (hover over the item you’re interested in…in my case d.responseText) to view the data returned, as shown below. With a little experimentation, you’ll get the data in the form you need:


- Lines 20-50: Here, we iterate over the items, set up some grouping info (more on that momentarily), and eventually push the item into the binding list created at the top of data.js. You might notice that the item is only pushed to the list if it has a venue property. The reason for this is that the starter kit I developed also uses the Bing Maps API to find nearby points of interest (by default, coffee shops) for a given meetup event, so it wouldn’t make sense to use events that don’t actually have a physical location. Drilling down into this code a bit deeper:
-
Lines 21-40: This section of code provides hooks for the grouping functions (defined earlier in data.js) to work with. Specifically, it checks the distance property returned by the API, and appends new properties to the group object (key, title, and subtitle) that are expected by the template’s databinding logic. Note that if the object in question already has such properties, they’ll be overwritten.
- Lines 41-49: This section of code creates some additional properties on the item to match up with what the template expects (the item title, content, and subtitle properties), and as noted before, pushes the item to the list.
But What About the UX?
Well, yeah. At this point our app isn’t very attractive, because the items returned from Meetup don’t have a backgroundImage property, as expected by the template. And although the API does have a property photo_url that returns the URL to the photo for the event, if it exists, my experience is that very few Meetup events actually have a photo. I’ll address how I dealt with this in a future post (though the code above provides a clue).
Wrap-Up
In this post, I showed how quickly you can go from the Grid App Template in Visual Studio 2012, to a Windows Store app displaying live data from the Meetup.com API. In future posts, I’ll explore additional lessons learned and techniques used in building my MeetupPOI Starter Kit.
If you’re ready to get started building your own app based on this, or other APIs, feel free to download the starter kit and jump in. If you’ve never written a Windows Store app before, here’s what you’ll need to get started:
- Mac users only: Boot Camp, Parallels Desktop, VirtualBox or VMWare Fusion
-
Windows 8 (a 90-day evaluation version available here)
- Visual Studio 2012 Express for Windows 8 (free – Professional or higher editions work, too)
-
-
- If you are a student, use the DreamSpark benefits for a free account
- If you are an MSDN Subscriber, use the one-time free account benefit associated with MSDN
- Otherwise, the account is $49 per annum, but with your first published app, your cost is covered via the Keep The Cash promotion (subject to Terms and Conditions)!
- If you are an MSDN Subscriber, use the one-time free account benefit associated with MSDN
- Lines 20-50: Here, we iterate over the items, set up some grouping info (more on that momentarily), and eventually push the item into the binding list created at the top of data.js. You might notice that the item is only pushed to the list if it has a venue property. The reason for this is that the starter kit I developed also uses the Bing Maps API to find nearby points of interest (by default, coffee shops) for a given meetup event, so it wouldn’t make sense to use events that don’t actually have a physical location. Drilling down into this code a bit deeper:
-
- Line 17: This line is where we make the call to the API, using the WinJS.xhr function. This function is simply a wrapper around the xmlHttpRequest browser function, and returns a Promise object rather than requiring a callback function. So when the request has completed, the anonymous function passed to the .done method will be executed. The use of promises can make your code more readable.