If you’ve written a game for the Windows Store or for Windows Phone, you may have noticed that some markets require the use of game rating certificates. If you’re like me, your initial reaction may have been “that looks hard” and as a result just skipped the process and only published where certificates aren’t required (for example, here in the United States, ESRB certification is optional).
Update 01/06/2016
The Windows Store team just announced a new single age rating system that they say will greatly simplify the process of submitting apps and games to the store. I haven’t had time to look deeply at the process, but wanted to include a link to the announcement for completeness’ sake.
Why Rate My Game?
The first question you may have is why you’d want a game rating at all? Well, there are a few answers to that:
- In some cases, it’s required. Some markets require a game rating certificate in order for you to sell your game into that market. That makes it a no-brainer for those markets.
- Help parents make informed decisions about games and content for their kids.
- A game rating may provide additional confidence in your game, and as such, may help sales.
Those aren’t necessarily the only reasons to get a rating certificate for your game, but they should hopefully be enough to convince you, especially since…
It’s Easier Than You Think
I have good news for you. For many markets, the process for getting a ratings certificate for your app is not only easy, it’s also fast.
Here’s an overview of the process for Windows Store apps:
- The first step is to set up your Windows Store developer account.
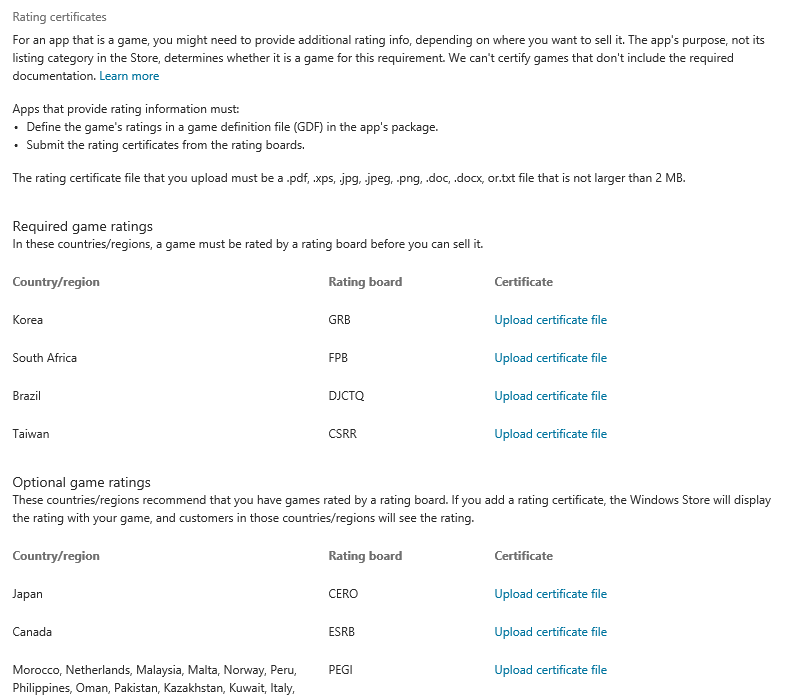
- Next, head over to your dashboard, log in, and click or tap the “Submit an app” link. You’ll need to fill out the App name, Selling details, and Services sections before you get to the part that’s key for game ratings, namely the “Age rating and rating certificates” section. That section includes information on all of the countries for which game rating certificates are either required or optional, as shown below (note that I’ve truncated the list of optional certificates…more are listed on the dashboard):

Note that for each country where a rating is required or optional, there’s a link to upload the rating certificate file. OK, but where do you get that? Read on… - Note the “Learn more” link above, which links to the documentation for age ratings and rating boards. Here, among other things, you’ll find links to all the relevant ratings agencies for various jurisdictions, including ESRB, which covers the United States and Canada. It also indicates the process for each particular system, whether that be via an online form (ESRB and PEGI, for example), or via submission of your app for review. The former is obviously faster and easier, so let’s walk through the ESRB process. Clicking the ESRB link takes you to the online form for rating an app for the Windows Store.
- Simply fill out the required fields, using your app name, as reserved in your store listing, the email address at which you wish to receive your certificate (I used the same Microsoft account that’s associated with my store developer account, but I don’t think that’s required), and company (for company, I provided my publisher name for my store account), then click the NEXT button, which will display a questionnaire about the content and other elements of your app.
- Fill out the questionnaire, accurately representing the content of your game, and click the NEXT button, and you will be presented with the unconfirmed rating for your game, based on your responses in this step.
- Read the ESRB Terms and Conditions (linked on the “Content Summary” page), and if you agree, check the checkbox and click the “Confirm” button. You should then receive your game rating certificate via email at the address you provided in step 4. Save the certificate to your local machine.
- Once you have your rating certificate, return to the “Age rating and rating certificates” step of your app’s store listing, and click the “Upload certificate file” link for the relevant rating organization (in our case, ESRB), locate the certificate file you saved in the previous step, and click the Open button to upload it.
That takes care of the rating certificate itself, and should only take you a few minutes at most.
Letting Windows Know About Our Rating
For Windows Store games that provide rating information, there are two requirements, as listed in the “Age rating and rating certificates” page:
Apps that provide rating information must:
- Define the game’s ratings in a game definition file (GDF) in the app’s package.
- Submit the rating certificates from the rating boards.
We’ve taken care of the second requirement already, since it was the easiest. But now we need to add a GDF file for our app, which is a little more involved, but well worth doing, since it’s this step that will enable our game to participate in the Family Safety feature that Windows provides, which helps parents determine what kinds of apps and content their children can use. As a parent of two young boys, this feature is pretty important to me, and having games that properly implement a GDF means that I can use the game rating level as a broad measure of which apps and games are allowed (or not).
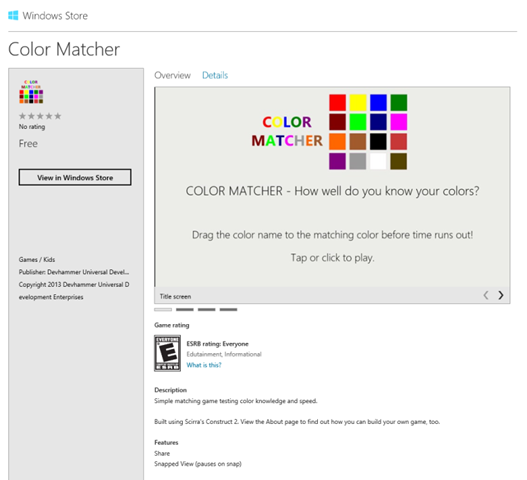
The Age ratings and ratings boards documentation mentioned earlier contains a link to the detailed process for creating a GDF file for your app or game, and includes step-by-step instructions and illustrations, so I won’t reproduce those here. Follow those steps carefully, including the steps for testing your app locally using an account set up for Family Safety. I added the DLL produced by the process to the root of my project. The only real gotcha I encountered is that when I tested my app using the Windows Application Certification Kit (WACK), I got the following error “[APPNAME] takes a dependency on Microsoft Visual C++ Runtime Package framework but is missing the framework dependency declaration in the manifest.” This is because the GDF container is a C++ DLL, and I needed to add a reference in my project to the “Microsoft Visual C++ Runtime Package” as described in this blog post, which resolved the WACK error. Once that was resolved, I finished adding the remaining required information for my game’s store listing, and submitted the updated game. Once approved, here’s what my store listing looks like, with my rating prominently displayed:
What About Windows Phone?
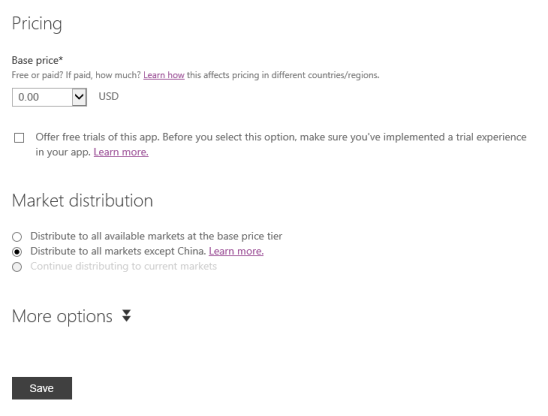
Given how straightforward the process of obtaining a rating certificate was for Windows Store, I figured since I also have a version of my Color Matcher game for Windows Phone, I might as well go ahead and get that rated as well. The process for obtaining the rating certificate is essentially the same, though the links for the online forms are different for Windows Phone. The Windows Phone documentation for game ratings has all the relevant links for Windows Phone. Another small difference is that for Windows Phone, you submit your rating certificate on the App info page of your store listing (which you can get to by visiting the Dashboard link at http://dev.windowsphone.com/. Note that in order to see the game rating certificates section of the page, you must both select the games category for your app, and click on the “More options” link just above the Save button, as shown below:
Once there, you simply select the appropriate rating from the drop-down list, and then click the “Browse…” button to locate the rating certificate(s) for your game. Since I had published the phone version of Color Matcher to the UK, I decided to add a PEGI rating in addition to ESRB. The process for PEGI is quite similar to that for ESRB, and just as fast.
I’m still waiting for the updated version of Color Matcher for Windows Phone to complete the certification process, but I’m confident it should go through with flying colors.
Conclusion
So that’s a brief tour through the process of getting a ratings certificate for your game for the Windows Store and/or Windows Phone. Although I expected the process to be time-consuming and onerous, for the most part it was both easy and quick, and for the US, Canada, and Europe, all of which are encompassed by ESRB and PEGI, you can very quickly obtain ratings certificates for your games by answering a few simple questions. Obviously, for markets where app submission is required as part of the rating process, you will need to allow some additional time, but there’s no reason not to start with the low-hanging fruit, and add those markets requiring additional steps via a subsequent update to your game(s).
Want to know more about developing apps and games? You can get links, videos, and more for free at App Builder. Sign up takes only a few seconds, and the resources can help make you the next app rockstar. And if you publish your app (for Windows Store or Windows Phone) between now and June 30th, you may be eligible for $100 per app (up to 10 apps) from the Keep the Cash promotion. Don’t delay, as you’ll need to get your apps submitted well before the deadline to ensure they are in the store in time.
You can also join me for an upcoming Office Hours, where I can provide 1:1 technical advice on building your app and getting it into the Windows Store.
Drop me a note if you’re working on a Windows 8 app and have questions or need advice, or if you’ve published your app already, let me know so I can spread the word!
Comments
Comment by ConfusedCallum on 2013-12-11 02:44:00 +0000
Following the instructions on the MSDN page does not produce a DLL, only a header file, Resource Script, and XML doc. Am I missing something?
Comment by devhammer on 2013-12-11 08:50:00 +0000
Hmm…a brief review of the page suggests that it may have changed after I wrote this. I’ll try to find some time to test the process again, and see if I can verify the update, but it would appear that the process has been simplified, removing the need to compile the DLL and include it in the project.
From an initial review, the process for Windows Store appears to be a little closer to Windows Phone, except that instead of uploading the rating certificate directly, you need to upload the GDF XML file.

