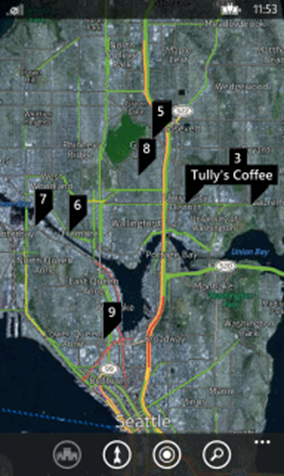
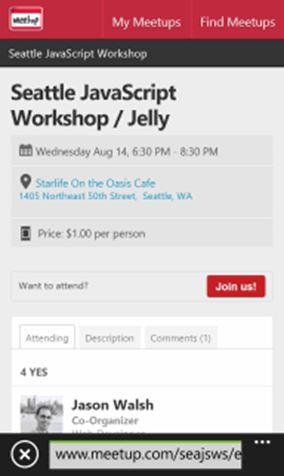
Not too long ago, as part of my team’s effort (which we call APIMASH) to create a set of starter kits to demonstrate how to use a variety of publicly-available APIs in Windows Store apps, I created an app that leverages the Meetup.com API, along with the Bing Maps JavaScript SDK, to retrieve upcoming Meetups for a given city and also display coffee shops nearby the Meetup location.
You can see a screenshot below:
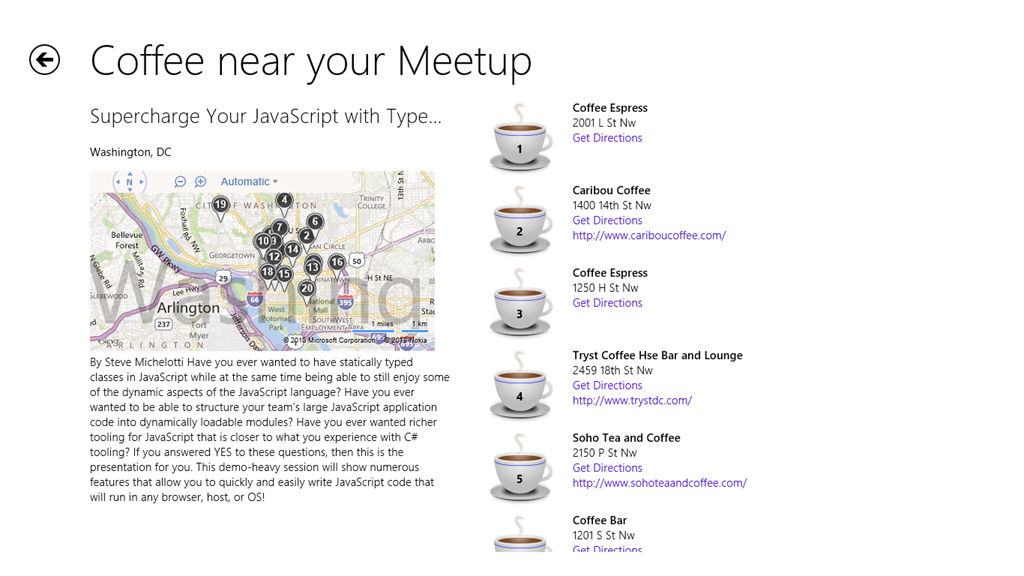
The goal of my starter kit (and the other kits on the site) is to demonstrate how to call the API from a Windows Store app, how to display the results (in my case using databinding), and also to provide a starting point for folks who might want to “mash up” one of the starter kits with additional data from other APIs.
Reimagining for Windows Phone
The next step in APIMASH is bringing our starter kits to Windows Phone. In my case, my original starter kit was written using HTML and JavaScript, and built on top of the Grid App Visual Studio template, which uses the WinJS ListView control to display the data on the home page.
Because WinJS is not supported on Windows Phone, I had to make a decision on how to move the app to that platform. I could have chosen to use the WebBrowser control, and architect the app using the single-page-app (SPA) style of development, using libraries like KnockoutJS, etc. And if I was starting an app today from scratch that I wanted to build with HTML and JavaScript, and deploy to both the Windows Store and Windows Phone, that would probably be an avenue I’d explore. Perhaps I’ll do just that in a future blog post. In the meantime…
Given the UI differences between a PC and a phone, I figured I would just approach the phone version of the app in the same way I did the Windows Store version…find the Visual Studio template that most closely approximates my needs, and modify it as little as needed to achieve the UX and functionality I desired.
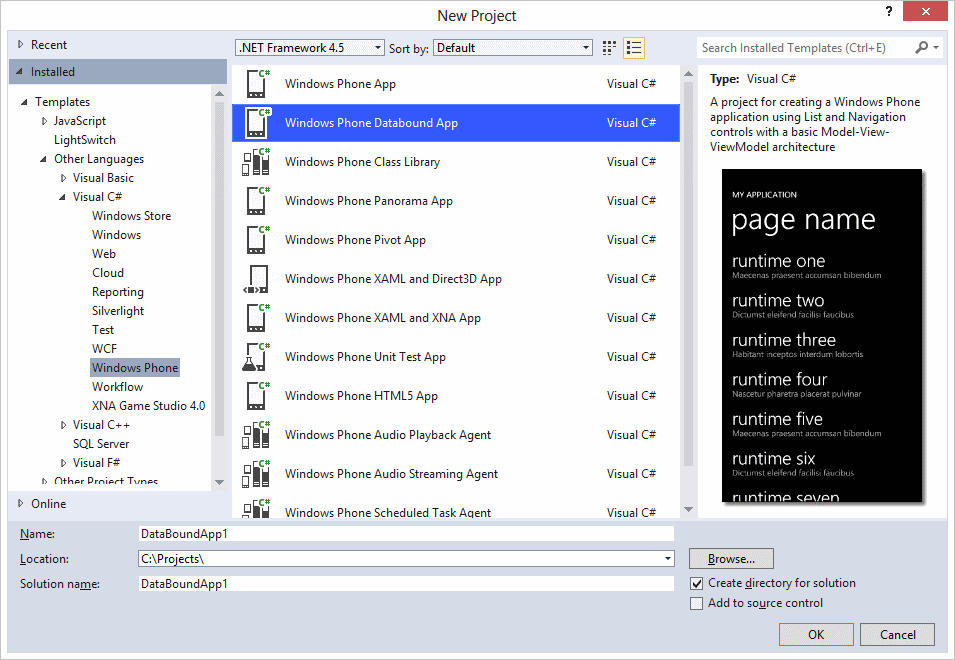
I settled on the Windows Phone Databound app template, as shown in the dialog below:
This template provides a simple databound list in the main page, and when any given item is invoked, the app navigates to a details page for that particular item. The app uses a simplified MVVM architecture, and demonstrates the use of sample data as well.
Understanding the Template
The Windows Phone Databound App template is pretty straightforward. It consists of:
- 2 XAML pages, MainPage.xaml and DetailsPage.xaml (both with accompanying “code behind” C# files.
- An App.xaml file, whose main purpose in the context of the app template is to instantiate and initialize the main viewmodel of the app (more on that in a moment)
-
A set of design-time sample data, implemented in a XAML file (this file is located in the aptly-named SampleData folder)
- A pair of ViewModel classes, implemented in C#, a MainViewModel, which implements the items collection which will be bound to a list in MainPage.xaml, and an ItemViewModel, which contains the properties that represent an item.
We could just stuff the values we want for a given meetup into these properties, which would avoid some changes elsewhere in the code, but there are a couple of problems with this…one, it would be potentially confusing to stick with such generic property names, since they don’t tell us anything about what the property represents, and two, we probably actually need more than three properties. We’ll come back to the ItemViewModel momentarily.
The MainViewModel, which as noted above is instantiated and initialized at app launch in App.xaml.cs, is responsible for creating an ObservableCollection of ItemViewModel items, and (via its LoadData function) populating the collection with data. In the template code, the runtime data is populated by simply adding a bunch of instances of the ItemViewModel class initialized with sample data.
Template Modifications
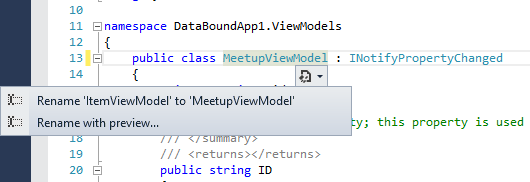
To modify the template code for our purposes, we’ll start with the ItemViewModel.cs class. First, we’ll rename both the class and the filename to MeetupViewModel, to be more descriptive of what the model is. One nice feature of C#, if you’ve not used it before, is the support for refactoring, in particular for renaming members. So when we change the class name from ItemViewModel to MeetupViewModel, Visual Studio gives us a hint that there’s some context-specific commands available, which we can expand using the Ctrl+. keystroke combo, which shows the following:
This command will search the project, and find all references to the ItemViewModel class and update them to the new name. If you prefer to review each change, you can use Rename with preview… This is a very convenient way to quickly update all (well, nearly all…if a member is referred to by a string, such as in the call to NotifyPropertyChanged in the the property declarations, rename won’t update it).
Next, we’ll update the properties and replace the generic LineOne, LineTwo, etc. properties with more descriptive properties, including MeetupID, Name, Url, Description, CityState (combines the City and State fields from the Meetup venue property, for easier display), and more. One of the advantages of using a ViewModel is that we can describe how we want the data to look for our app, regardless of whether that’s how the original data actually looks. When we load the data, we can massage it to fit the format we want to use.
That’s all that’s needed for the MeetupViewModel class.
For the MainViewModel (view the full code here), we’ll start in the constructor. In order to support the retrieval of live data, we’ll add a couple of lines of code to create an instance of the System.Net.WebClient class, and handle its DownloadStringCompleted event:
1: public MainViewModel()
2: {3: _client = new WebClient();
4: _client.DownloadStringCompleted +=5: _client_DownloadStringCompleted;6: this.Items =
7: new ObservableCollection<MeetupViewModel>();
8: }In the LoadData function, we need to remove the code that creates sample data, and replace it with code that constructs the request URL for the Meetup API…in the code below, I’m referring to static members of an AppConstants class, which is used to provide a single location for customizing the most common parameters for the app (which city to search in, what keywords to search for, Meetup API key, etc.). Also, note that to keep things simple, I’ve not added any exception handling or code to deal with network availability (or lack thereof), so for a production app, you’d want to add that code yourself. Here’s the updated LoadData:
1: public void LoadData()
2: {3: AppConstants.meetupUri += "&city="
4: + AppConstants.meetupCity5: + "&state=" + AppConstants.meetupState
6: + "&page=" + AppConstants.maxMeetupsToFind
7: + "&key=" + AppConstants.meetupKey
8: + "&radius=" + AppConstants.meetupDistance;
9: if (AppConstants.meetupKeywords != "")
10: {11: AppConstants.meetupUri +=12: "&text=" + AppConstants.meetupKeywords;
13: }14:15: _client.DownloadStringAsync(new
16: Uri(AppConstants.meetupUri));17: }Pretty simple…we just construct the URI with the parameters desired, and call DownloadStringAsync with the URI.
Next, we add the handler function for handling the response from the WebClient request, like so (apologies for any extra line breaks in the code…you can view the code on gihub for a more readable version):
1: void _client_DownloadStringCompleted(object sender,
2: DownloadStringCompletedEventArgs e)3: {4: XElement meetupElements =5: XElement.Parse(e.Result);6:7:8: var meetups =9: from meetup in
10: meetupElements.Descendants("item")
11: where meetup.Element("venue") != null
12: select new MeetupViewModel
13: {14: MeetupID =15: meetup.Element("id").Value,
16: Name =17: meetup.Element("name").Value,
18: Url =19: meetup.Element("event_url").Value,
20: Description =21: meetup.Element("description").Value,
22: CityState =23: meetup.Element("venue").Element("city").Value
24: + ", " +
25: meetup.Element("venue").Element("state").Value,
26: Latitude =27: meetup.Element("venue").Element("lat").Value,
28: Longitude =29: meetup.Element("venue").Element("lon").Value,
30: LatLong =31: meetup.Element("venue").Element("lat").Value
32: + ", " +
33: meetup.Element("venue").Element("lon").Value
34: };35:36: var index = 0;37: foreach (MeetupViewModel
38: meetupItem in meetups)
39: {40: meetupItem.ID = index.ToString();41: this.Items.Add(meetupItem);
42: index++;43: }44:45: this.IsDataLoaded = true;
46: }
In the code above, we start by using Linq to XML (requires a reference to System.Xml.Linq) to parse the XML returned from the request to the Meetup API. We could request JSON as the format as in the HTML/JS version, but Linq to XML is pretty awesome, so XML makes more sense here.
Once parsed into a series of elements, we run a Linq query that looks for all meetups that are in-person (since we’re focused on finding local coffee shops near each meetup, including online/virtual meetups wouldn’t make much sense), and for each of the returned items, creates a new instance of the MeetupViewModel class, mapping the desired values from the elements in the XML data to the properties of the MeetupViewModel class.
Once that’s done, we loop over the results, and add a simple numeric ID to each (this property is used in the app navigation to identify which item was invoked…see DetailsPage.xaml.cs for how its used), and then add the item to the ObservableCollection created at app startup, and increment the ID value.
Assuming no errors, we’ve now got data! But since we’ve changed the names of the properties, the databinding code found in MainPage.xaml, and DetailsPage.xaml will no longer work. Let’s fix that.
In MainPage.xaml, the changes are pretty straightforward…we just need to update the bindings to the new property names. In the template, MainPage.xaml contains an ItemTemplate for the LongListSelector control, which has a DataTemplate containing two TextBlocks inside a StackPanel. These are bound to LineOne and LineTwo respectively, and I want them to show the meetup Name and the composite CityState property, so I just need to update these like so (some attributes omitted for readability):
1: <TextBlock Text="{Binding Name}"
2: TextWrapping="Wrap"/>
3: <TextBlock Text="{Binding CityState}"
4: TextWrapping="Wrap"
5: Margin="12,-6,12,0"/>
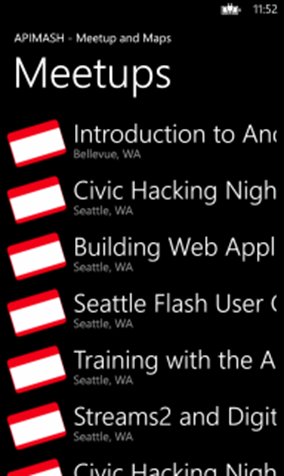
I also updated the app name and page name to be specific to my app, and added a Meetup-style icon for each row in the list, and the result looks like this:
Note that no changes were needed to the code-behind for MainPage.xaml, as the page relies solely on declarative databinding for the display of the items. Tapping any of the items will navigate to DetailsPage.xaml, but if we do that now, the app won’t work, because we’ve not yet updated that page.
Here, the changes are a little more substantial, but not dramatically so. As with MainPage.xaml, we should change the app and page name, and then also update the placeholder property names to the ones in our MeetupViewModel class. We’ll also add a Map control to the page, as well as a couple of buttons to show us nearby coffee shops and to navigate to the web site for the specific meetup. Here’s what the updated XAML looks like (some attributes omitted for readability):
1: <StackPanel x:Name="TitlePanel"
2: Grid.Row="0" Margin="12,17,0,28">
3: <TextBlock
4: Text="APIMASH - Meetup and Maps"/>
5: <TextBlock
6: Text="{Binding Name}"
7: Margin="9,-7,0,0"/>
8: </StackPanel>
9:10: <Grid x:Name="ContentPanel"
11: Grid.Row="1" Margin="12,0,12,0">
12: <ScrollViewer Margin="0,0,0,365">
13: <TextBlock
14: Text="{Binding Description}"
15: TextWrapping="Wrap"/>
16: </ScrollViewer>
17: <maps:Map x:Name="MyMap"
18: Loaded="MyMap_Loaded"
19: LandmarksEnabled="True"
20: PedestrianFeaturesEnabled="True"
21: VerticalAlignment="Bottom"
22: Height="280"
23: Width="430" Margin="13,0,13,80"/>
24: <Button Content="Need COFFEE!"
25: HorizontalAlignment="Left"
26: Margin="0,527,0,0"
27: VerticalAlignment="Top"
28: Height="80"
29: Width="230"
30: Click="Button_Click"/>
31: <Button
32: Content="Meetup Site"
33: HorizontalAlignment="Left"
34: Margin="216,527,0,0"
35: VerticalAlignment="Top"
36: Height="80" Width="230"
37: Click="Button_Click_1"/>
38: </Grid>
In the code-behind (DetailsPage.xaml.cs), we first need some using declarations for the namespaces of the various features we’ll add:
1: using System.Device.Location;
2: using System.Windows.Shapes;
3: using System.Windows.Media;
4: using Microsoft.Phone.Maps.Controls;
5: using Microsoft.Phone.Tasks;
6: using APIMASH_MeetupMaps_StarterKit.Customization;
All but the last two are related to the map functionality. Microsoft.Phone.Tasks allows us to access two of the tasks (MapsTask and WebBrowserTask) we’ll use to handle our button clicks. And the last one provides easier access to the AppConstants class containing our static variables, which includes the search term used below.
Next, because we’ll be using its value in some of our other code, we need to move the declaration of the index variable to the start of the codebehind class:
1: public partial class DetailsPage : PhoneApplicationPage
2: {3: int index;
4:5: // Constructor
6: public DetailsPage()
7: {8: // etc.
9: }The OnNavigatedTo event is unchanged, apart from the modification to where the index variable was declared.
When the map control is loaded, it will fire its Loaded event, which is mapped to the MyMap_Loaded handler:
1: private void MyMap_Loaded(object sender,
2: RoutedEventArgs e)3: {4: double lat =
5: double.Parse(App.ViewModel.Items[index].Latitude);
6: double lon =
7: double.Parse(App.ViewModel.Items[index].Longitude);
8:9: MyMap.Center = new GeoCoordinate(lat, lon);
10: MyMap.ZoomLevel = 15;11:12: // Create a small circle to
13: // mark the current meetup location.
14: Ellipse myCircle = new Ellipse();
15: myCircle.Fill =16: new SolidColorBrush(Colors.Red);
17: myCircle.Height = 20;18: myCircle.Width = 20;19: myCircle.Opacity = 50;20:21: MapOverlay myOverlay = new MapOverlay();
22: myOverlay.Content = myCircle;23: myOverlay.PositionOrigin = new Point(0.5, 0.5);
24: myOverlay.GeoCoordinate = MyMap.Center;25:26: MapLayer myLayer = new MapLayer();
27: myLayer.Add(myOverlay);28: MyMap.Layers.Add(myLayer);29: }The code above grabs the latitude and longitude values from the current meetup item, based on the index of the selected item, centers the map on those coordinates, and then adds an Ellipse object to mark the location of the meetup.
The last bit of additional code are the button click event handlers:
1: private void Button_Click(object sender,
2: RoutedEventArgs e)3: {4: double lat =
5: double.Parse(App.ViewModel.Items[index].Latitude);
6: double lon =
7: double.Parse(App.ViewModel.Items[index].Longitude);
8:9: MapsTask getCoffeeTask = new MapsTask();
10: getCoffeeTask.Center = new GeoCoordinate(lat, lon);
11: getCoffeeTask.SearchTerm = AppConstants.searchTerm;12: getCoffeeTask.ZoomLevel = 16;13: getCoffeeTask.Show();14: }15:16: private void Button_Click_1(object sender,
17: RoutedEventArgs e)18: {19: WebBrowserTask meetupTask =20: new WebBrowserTask();
21:22: meetupTask.Uri =23: new Uri(App.ViewModel.Items[index].Url);
24: meetupTask.Show();25: }In the first, we once again grab the latitude and longitude from the meetup item, and use that to launch a new MapsTask, setting its SearchTerm to the configured searchTerm in our AppConstants class (which defaults to “coffee”).
The second click handler uses the WebBrowserTask to launch a new browser window for the web site for the meetup being viewed.
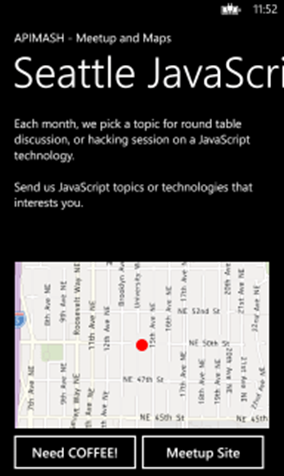
Here’s what DetailsPage.xaml looks like when we’re done:
Clicking the “Need COFFEE!” (and who doesn’t?) button launches the Maps app and shows coffee shops in the area:
Because we’re leveraging the built-in Maps app on the phone, we can now easily select a desired coffee shop and get walking or driving directions from our current location, without having to write any of that code ourselves.
Last, but not least, clicking the “Meetup Site” button opens a new browser window with the url set to the meetup site being viewed:
One other part of the template code that needed updating is the sample data. That’s not a critical part of the app, so I’ll leave that as an exercise for the reader. Or, if you don’t want to try updating that yourself, you can always take a look at the updated version on our Github repository.
Summary
While I’d had some concerns about trying to translate my original HTML and JavaScript Windows 8 app over to a XAML and C# app for the phone, the truth is it was easier than I expected. From end-to-end it took me only about 2 days to complete the project.
All of the code for this project, along with all of our other APIMASH starter kits, are available on the APIMASH Github site.
Building for Both
There are probably scenarios, particularly where you know up front that you want to target both Windows 8 and Windows Phone, where it might make sense to either use XAML and C# for both, or to leverage 3rd-party frameworks such as KnockoutJS, etc. to build an HTML and JavaScript app that could run on either platform. But despite some differences in accessing remote data, the concepts involved in building this app for Windows Phone really aren’t all that different from the original Windows 8 version.
If you’re interested in developing apps to target both Windows 8 and Windows Phone 8, there’s some good documentation available on the Windows Phone Dev Center. There’s also a video series covering the topic on Channel 9.
-
- An App.xaml file, whose main purpose in the context of the app template is to instantiate and initialize the main viewmodel of the app (more on that in a moment)
