TL:DR
Short version…some extra traffic crashed my blog last week, thanks to my decision to use cheap shared hosting. In response, I moved my blog to Windows Azure Web Sites, where I can easily scale to meet any traffic spikes. Read on for the background, or skip to “Making the Move” for the technical details.
The Background
Cheap hosting. It lures you in with the siren song of saving lots of money. And for a while, perhaps even a long while, it may give you everything you need. But sooner or later, you find out that you get what you pay for.
Crashing…Hard
 That’s exactly what happened to me last week. While out of town for a planning meeting with my teammates, I had a blog post that was already getting a fair amount of traffic, and I made some efforts to boost the traffic, with the end result being that my blog simply fell over and started throwing 404 and 500 errors left and right.
Now, I could have been grumpy and blamed my hosting company, but I made the decision, nearly 4 years ago, to go with a very inexpensive hosting plan, mainly to have someplace for personal projects and experimental code, so uptime wasn’t a critical concern. On the plus side, I got “unlimited” domains and bandwidth, for less than $5 a month (paying for 2 years at a time). Less than $100 for 2 years of hosting is a pretty good deal. And since I already had the hosting plan, it just made sense (at least at the time) to put my blog there. The downside is that cheap hosting doesn’t always scale well, as I discovered the hard way last week.
 So here I am, sitting in a planning meeting, staring at an error page where my blog should be, and wondering what to do. In the short term, thankfully, the answer was easy enough. I removed the post on another web property that was directing most of the extra traffic to my blog. The good news is that without the extra load, the blog came right back up. The bad news is that to keep my blog running, I had to give up the extra traffic. Not a great trade-off.
##
Enter Windows Azure
If you’re a regular reader of my blog, you’re probably aware of my series of posts on building app back-ends using Windows Azure. Although I’ve spent quite a lot of time writing code for Azure, I had not given much consideration to running my blog there, mainly because I already had web hosting in place, and I didn’t want to spend the additional money. In other words, I’m cheap.
But as one of my co-workers at the meeting pointed out, the problem I ran into last week is one for which Windows Azure Web Sites are tailor-made. With a web site in Windows Azure, you can run a single shared instance for around $10 a month, and should you need more capacity, you can simply bump up the number of instances while traffic is high, and back down again if and when the traffic returns to a lower level.
Making the Move
Once I’d made the decision to move my blog to Azure, the implementation was very easy. Part of this was the fact that I’m running Orchard CMS, and using SQL Server Compact as the data storage layer (Orchard also supports SQL Server and SQL Express, as well as MySQL). Because SQL Server Compact databases are file-based, migration was simply a matter of copying over all of the files, including the database file.
Although the file-based DB made it easier, the process itself is very straightforward…there were only 4 steps required to migrate my blog to Azure Web Sites:
- Create a new web site.
- Copy the existing version of the site to my local machine via FTP
-
Publish the existing site to Azure via WebMatrix
- Update the DNS records for my domain to point to Azure
-
- Copy the existing version of the site to my local machine via FTP
Creating a new Web Site
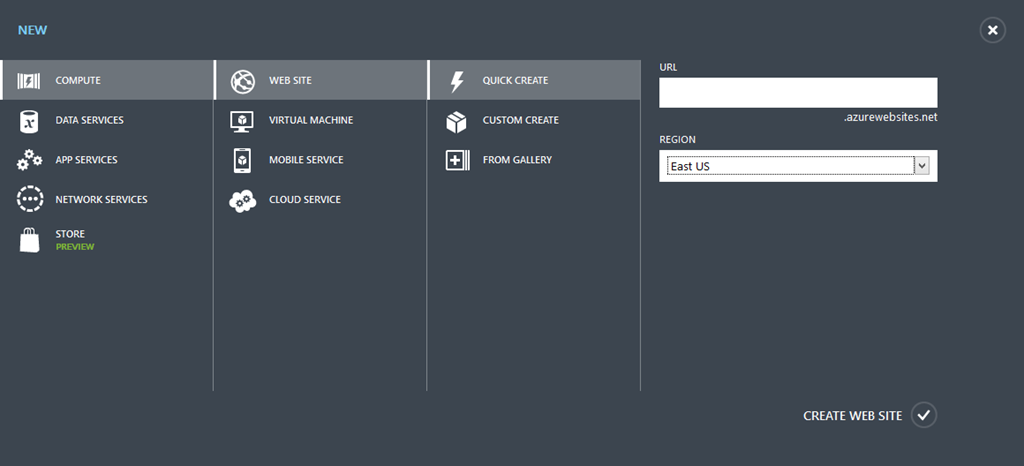
The first step in the process is pretty simple. If you’ve already signed up for Windows Azure, you can just visit the management portal, and click on the + NEW icon at the bottom of the page, which surfaces the options for creating any new service you might desire (if you haven’t signed up for an account, you can kick the tires with a free trial account, good for one month and up to $200 worth of services…signup is a one-page process, and while you do need a credit card, you will not be charged). The screenshot below shows the choices for a new Web Site:
In the screenshot above, all I’d need to do to create the web site is provide a unique url prefix such as myreallycoolwebsitename (the resulting fully qualified url would be myreallycoolwebsitename.azurewebsites.net), and click CREATE WEB SITE. For the screenshot above, I’m using an account I created with the free trial. If you have more than one subscription that you manage with a given Microsoft Account (what used to be Windows Live ID), you’d also see a drop-down below the REGION field that would allow you to select the subscription under which you want the web site to be created.
As an aside, if you want to know more about the Web Site creation process, in particular how you can create a new instance of WordPress or many other popular CMS or other apps from the Windows Azure Gallery, check out Blain Barton’s detailed walkthrough here. Short version…you can have a new blog up and running in less than 10 minutes, start to finish. It’s that fast.
Once I click the CREATE WEB SITE link, the portal switches me to the Web Sites tab, and shows the following while the web site is being created (click the image for a larger view):
Once it’s done, the status will change to “Running” and the site is ready to manage.
We’ll come back to the management portal shortly.
Downloading the Existing Site
The next step in the process was taking the code and data for the live site, and bringing it down to my local machine. This served two purposes, first, it gave me a complete backup of the live site, should anything go wrong with the transition, and second, my plan was to publish the site from my local machine using WebMatrix 3, which has great integration with Windows Azure Web Sites.
To download the site, I simply used FTP, and my go-to tool for this is FileZilla, which is free and works well. The main downside to this step in the process was time. FTP is reliable, but it’s not very fast. Fortunately, given that I was in a meeting, I could just kick it off and let it run.
Publishing with WebMatrix 3
Once I had a local copy of the site, it was time to break out WebMatrix 3 (which you can download here, or install with the Microsoft Web Platform Installer). One big addition to WebMatrix 3 is the ability to create, open, and publish to Windows Azure Web Sites as easily as local sites.
Note: Visual Studio, with the addition of the latest Windows Azure SDK, also allows you to access your Windows Azure Web Sites and Services, via Server Explorer.
If you’d like to see how the publish process works from Visual Studio, check out this great post by my fellow technical evangelist Brian Hitney.
With WebMatrix installed, I simply right-clicked on the folder containing the downloaded Orchard instance for my blog, and selected “Open as a Web Site with Microsoft WebMatrix”. Note that when opening a site this way, you may be prompted with a dialog asking if you’d like to create an empty Web Site in Windows Azure for publishing the site being opened locally. Since I already created the web site earlier, I just skipped this dialog.
As a sanity check, once the site was loaded in WebMatrix, I clicked the Run button at the top left of the IDE to make sure the site ran properly locally. WebMatrix runs its code using IIS Express. Once having verified that the site worked OK locally, it was time to push it out to my Windows Azure Web Site.
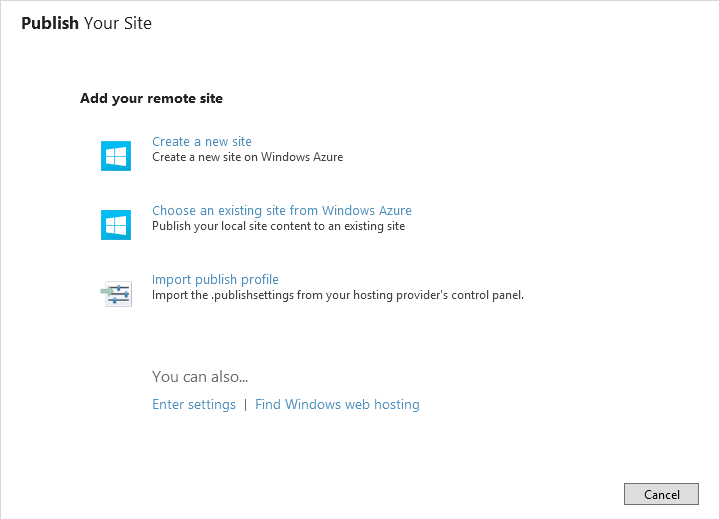
To publish, I just clicked the Publish button, right next to the Run button on the WebMatrix toolbar. The first time around, WebMatrix asks how you want to publish, using the following dialog (note that if you’ve not logged into WebMatrix using your Microsoft Account, you may be prompted to do so…you can add more than one account to WebMatrix if you need to manage multiple subscriptions):
Note: The “Import publish profile” option is helpful when you have a .publishsettings file from either a web host or your Azure web site dashboard.
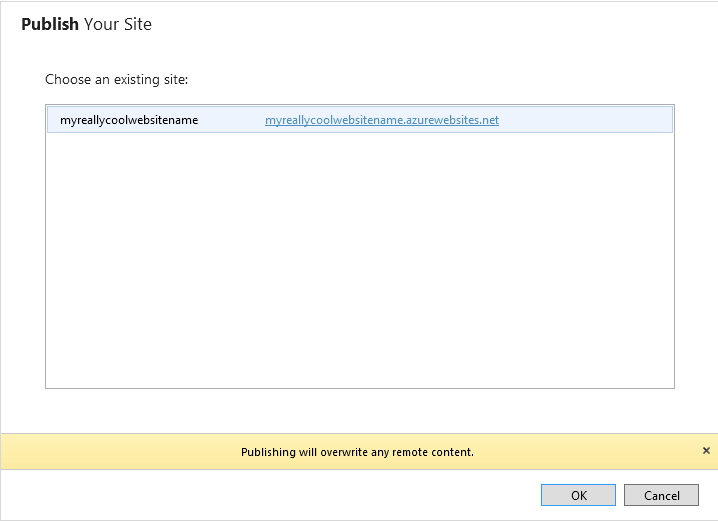
I selected the existing site option, which results in a dialog like the following (note that if I had multiple web sites under this account, they would all show up here):
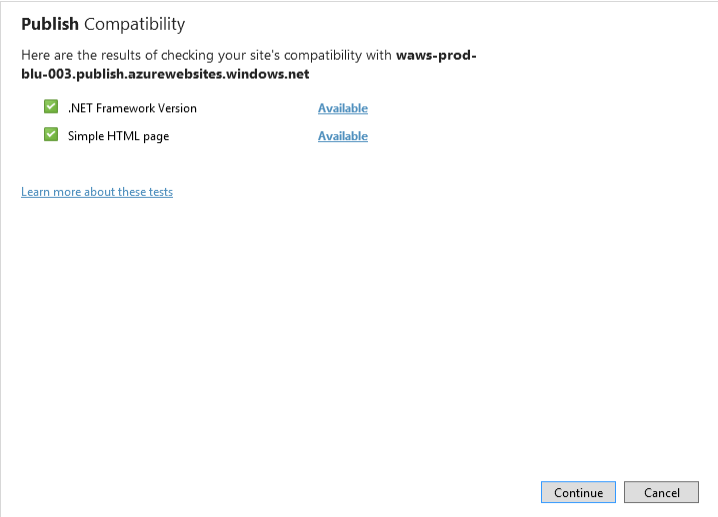
Since I knew the website was empty, I just clicked OK, after which I was prompted to check compatibility by uploading some files. At the same time, WebMatrix will also update the remote web site’s settings to be compatible with the local site. Assuming all goes well, as it did for me, the result looks like this:
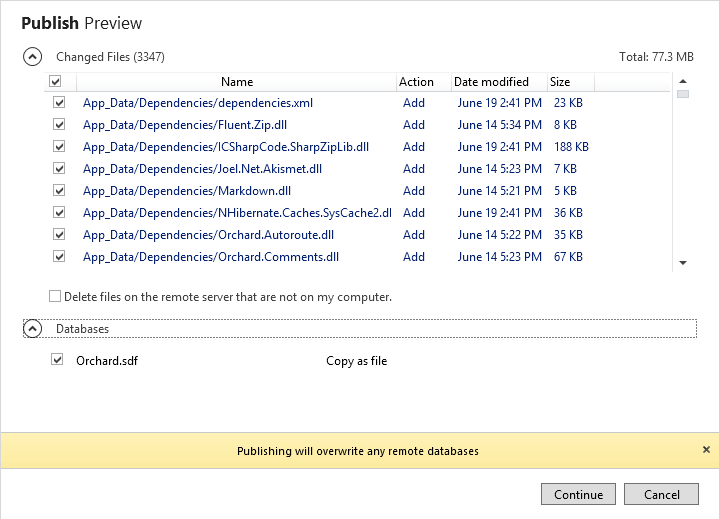
Once done with the testing, I clicked Continue, and was presented with the Publish Preview dialog, which includes a list of all the files to be published, including the SQL Compact database file, as shown below:
After verifying everything looked good, I clicked the Continue button, and the publish process started. Under the covers, WebMatrix is using the WebDeploy protocol, which is blazingly fast. In fact, the site that took nearly an hour to download via FTP was published via WebDeploy in roughly 3 minutes.
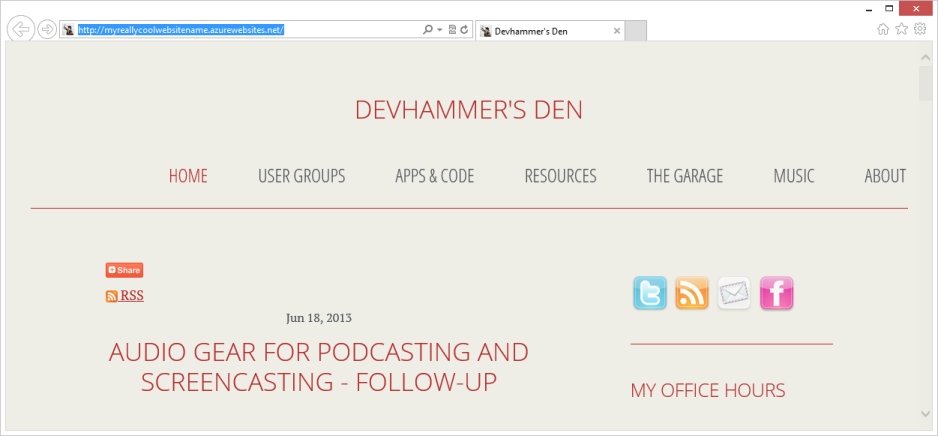
For purposes of writing this post, I walked through the process again, publishing an older backup of my blog to the web site I created on the trial account, and here it is running after publishing:
If I was OK with a URL ending in azurewebsites.net, that would be all I needed to do. But since my blog was already running at devhammer.net, I still needed to update the DNS records to point to my Azure web site, instead of my old web host.
What’s in a Name?
So far, in the examples I’ve shown, my site has been running using the free tier of Windows Azure Web Sites. You can run up to 10 free web sites on a single Windows Azure subscription, but one of the limitations is that free web sites cannot have a custom domain name.
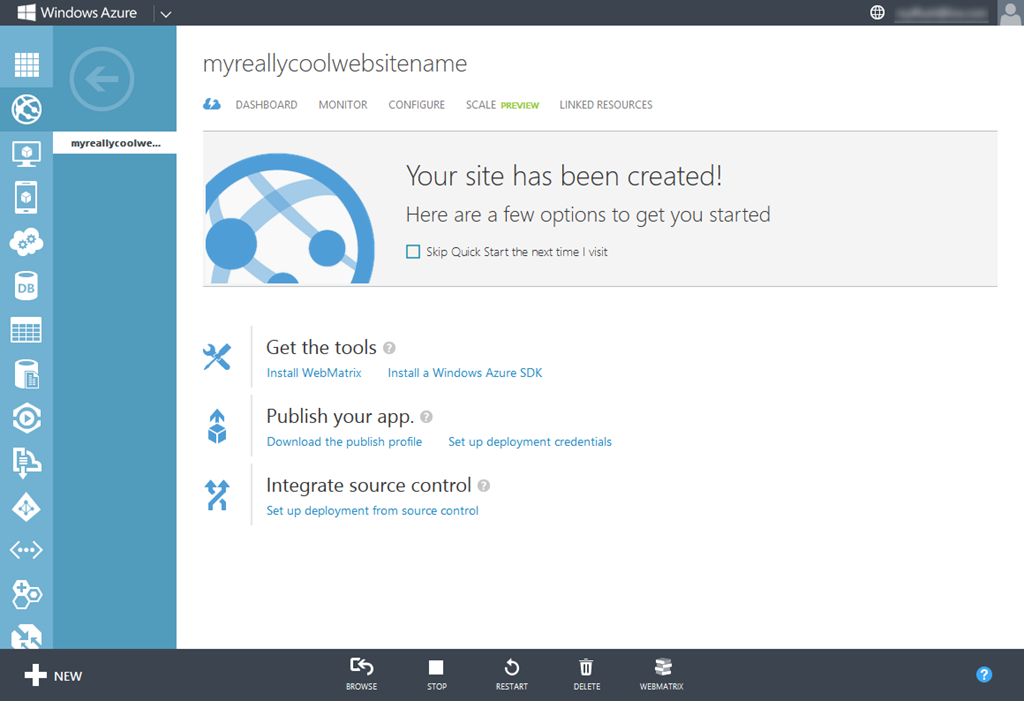
In order to configure my website to use my custom domain name, I needed to head back over to the management portal. The first time you open the portal for your web site, you’ll be greeted with the quickstart screen, as shown below (click for larger image):
Note that you can install WebMatrix and/or the Windows Azure SDK directly from here, among other tasks. The custom domain settings are on the CONFIGURE tab, but they won’t be enabled until the site is running in shared or standard mode, which needs to be enabled on the SCALE tab.
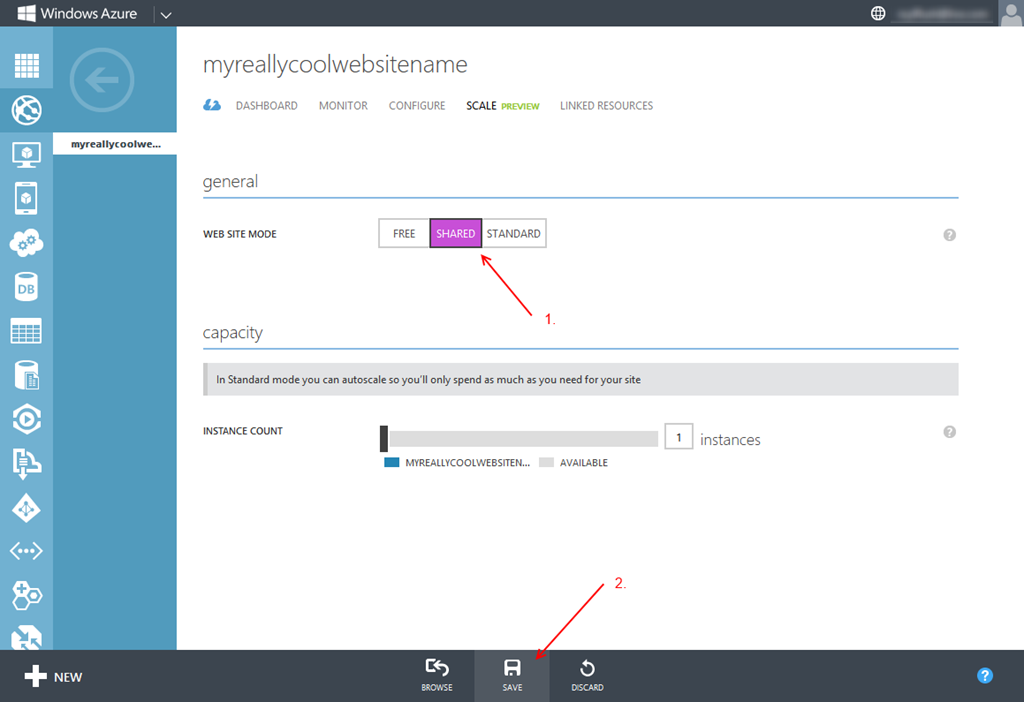
Switching to shared mode is easy, just click the SHARED option on the SCALE tab, then click the Save button at the bottom of the page:
Changing to shared mode will prompt with a warning that this mode may result in a bill. If you’re in trial mode, and the trial expires, or you use more than the $200 in credits that come with the trial subscription, your site will be shut down. For pay-as-you-go, or other subscriptions, converting from free to shared mode will incur charges. You can view the pricing information here.
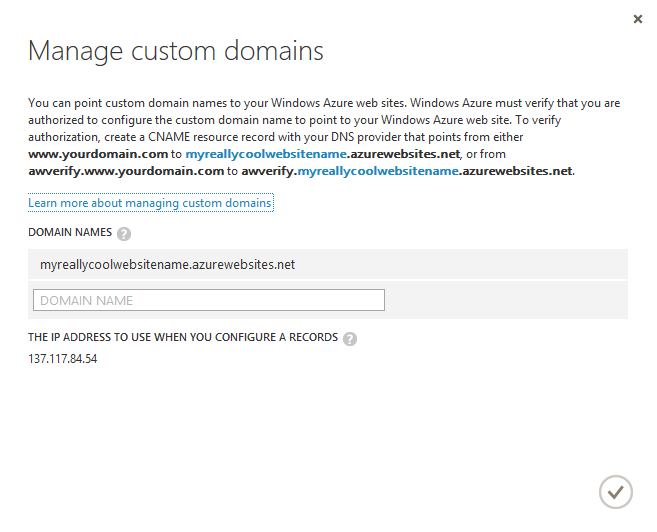
Once the site is running in shared mode, I can click on the CONFIGURE tab, and click on the manage domains button (big green button…scroll down to get to that section), which results in the following dialog:
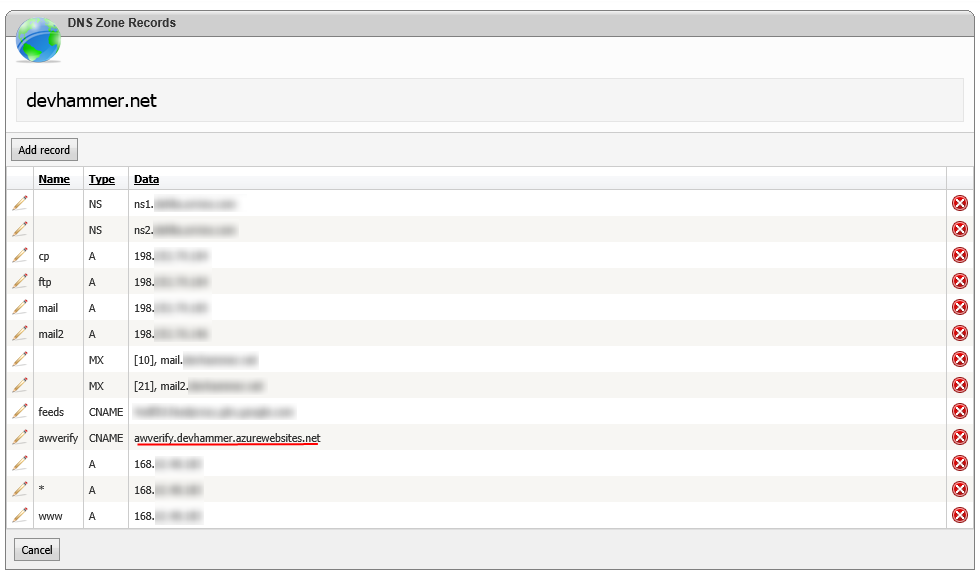
Adding a custom domain name is essentially a two-step process. First, I had to add a CNAME entry (basically, an alias) that satisfies the requirements for verification. In my case, I went to the control panel for my current web host (which also handles DNS for my site), and added the CNAME entry to point to the awverify subdomain as noted in the instructions above (see the screenshot below for what this looks like). Once that entry had propagated to the point where the Azure servers could see it, I was able to create A records (the main record pointing my domain name to a specific IP address) that pointed to the IP address listed for the web site.
At that point, all that was left to do is wait. One downside of a global naming system like DNS is that it can take time for all the DNS servers worldwide to get the updated records. While there are some DNS provides that allow you to update the TTL (time to live) value for your DNS records in order to speed the propagation time, this wasn’t an option in my case.
The total time spent to get to this point was less than 2 hours. DNS propagation wasn’t fully complete until the next morning, but since the existing site on my shared web host was running also, this was not a problem at all.
My fellow Microsoftie Pete Brown recently shared his own experience moving his blog to Azure, and included a link to a useful third-party site that makes it simple to track the progress of the DNS propagation.
The Experience So Far
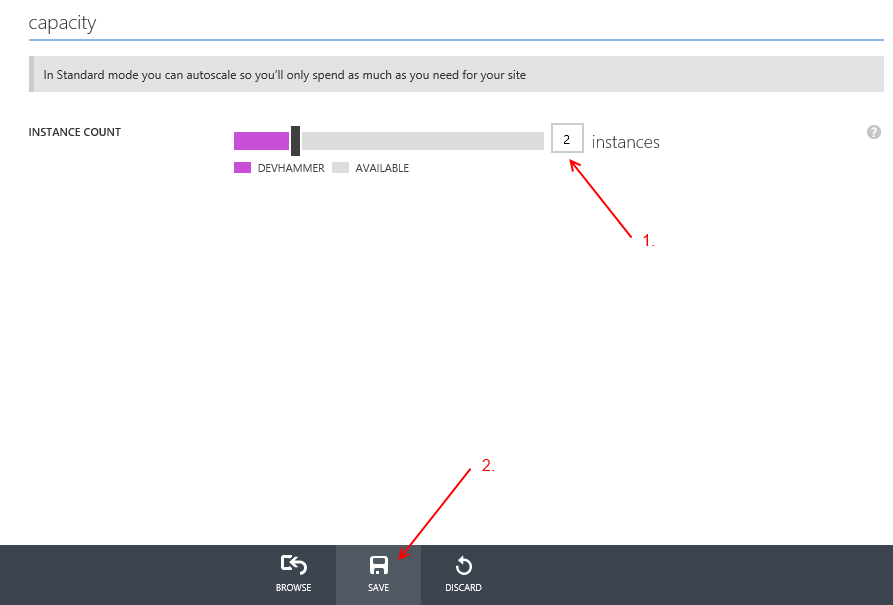
As of this post, I’ve been running devhammer.net in Azure for a week. I’m running using a single shared instance, and I’ve yet to see any of the usage stats (CPU, file system storage, memory use) come anywhere near their limits. There’s a great deal of comfort in knowing, however, that if I experience a spike in traffic that taxes the single instance, I can easily jump over to the SCALE tab of the management portal, and bump up to 2 or more instances as needed, and only pay for them as long as necessary to endure the spike in traffic. Here’s what it looks like for my actual devhammer site:
Scaling down is just as simple. Of course, if you’re hosting a more mission-critical site, you can move up to standard mode, which includes the ability to auto-scale (this feature is currently in preview) within a selected range of instances. For example, you could configure auto-scale to automatically scale from 1 up to 5 instances based on CPU usage, and set the target range of the CPU usage to add an instance above 80 percent CPU, and drop an instance once CPU goes below 60 percent. This costs more, but for commerce sites and others needing higher availability automatically, this can be a good option.
Summary
Growing traffic is a good thing, but web traffic doesn’t often grow in a linear fashion, and can include unpredictable spikes that have all too predictable results. Using cheap shared hosting may be tempting from a pure dollars and cents perspective, but the hidden cost is that you may find it fails you at exactly the wrong time.
Windows Azure Web Sites provides an affordable way to get your site up and running in an environment that provides virtually instant elasticity, and the ability to scale to handle as much traffic as your popularity can deliver.
In all, it took me less than 24 hours to move my Orchard CMS-based blog from my existing web host to a Windows Azure Web Site, including DNS propagation. At around $10/mo., the single shared instance I’m using is more than twice as expensive as my existing hosting plan was. But I sleep much better knowing that my site can scale to meet whatever demands I throw at it.
If you’ve got an existing site, and you’re concerned about whether it’ll hold up to a significant increase in traffic, or if you’re thinking about starting a blog or similar website, you should give Windows Azure Web Sites a try. It’s very easy to get started, and you can try it for free for a month. There’s nothing to lose, and if nothing else, you’ll learn something useful.
[404 image by Adam Koford, aka Ape Lad]
[UPDATE: Thanks, @scottgu, for the shout-out. Given that it hit my shiny new Windows Azure Web Site with between 6-10x the usual traffic, it provided a nice stress test, too. The good news is that the single shared instance isn’t even breaking a sweat.]
Comments
Comment by Justin on 2013-08-10 20:15:00 +0000
Can you explain scaling up to 2 instances in more detail? Is it a shared database, or replicated?
Is DNS done as round-robin with 2 instances?
I’m thinking of this for use on a dynamic website so ensuring both instances have the latest database data is my concern.
Comment by devhammer on 2013-08-10 20:49:00 +0000
When you run multiple instances, Windows Azure creates the additional instance(s) in existing running VMs, so it’s really fast. As far as I’m aware, the load balancing is round robin. This forum thread has some additional info: http://social.msdn.microsoft.com/Forums/windowsazure/en-US/62f48aed-5974-4c2c-b61b-63305d98791a/websites-vs-webroles-vs-vms-load-balancing
Comment by devhammer on 2013-08-10 22:22:00 +0000
One other point…given the nature of the load balancing, if you want to ensure database consistency, you should probably plan on having the persistence mechanism outside of the website itself. Could be a Windows Azure SQL Database, or Windows Azure storage, or another solution.
Comment by Essam on 2013-08-11 12:50:00 +0000
Using SQL Compact in Azure is risky as far as I know, because the data you modify (new posts, uploaded files from the site … etc.) are not persistent.
For example, if you deployed your site today and a month later the node you have your site on failed for some reason, Azure will provision another a new node for you, but will deploy the code you deployed a month ago and you’ll lose a month worth or posts… of course, unless you manually take a back up of your database every time it changes.
Comment by devhammer on 2013-08-11 14:38:00 +0000
I’m looking into this further, but I don’t think it works the way you think it does. Windows Azure Web Sites stores content files via Azure Cloud Drive, so there is one copy of the content, including the database in the case of SQL Compact. Cloud Drive automatically provides fault tolerance, so even if your website instance failed and needed to be created, your files should be fine. While there might be some concerns about how many instances you could have hitting a SQL Compact db before you might run into issues, I don’t think there is any significant risk of losing posts.
That being said, it would probably be wise to use an external database to get the best scalability.
And as noted above, I’m digging into this deeper, and once I’ve got a more detailed answer, I’ll either update this post, or add a new post with the info.
Comment by Essam on 2013-08-12 13:34:00 +0000
Good; can’t wait to see your findings.
For now, just take extra caution 🙂 I don’t think Windows Azure can automatically distinguish between your web site files and your content file.
Comment by devhammer on 2013-08-12 14:30:00 +0000
One good resource I’ve found already is an interview with Nir Mashowski, from the Windows Azure Web Sites team, discussing some of the under the covers operation of WAWS: http://channel9.msdn.com/Shows/Web+Camps+TV/Windows-Azure-Web-Sites-Internals-with-Nir-Mashkowski
Comment by B. Clay Shannon on 2013-08-26 16:22:00 +0000
I’m about to publish a site (within the next few days), and am considering azure because of the scalability factor; the thing that I don’t like is the “.azurewebsites.net” suffix. I think this may be off-putting to “normal” people (non-geeks). They won’t be used to such nomenclature, and if somebody tells them the base name of the site, they’re just going to assume the suffix is “.com” and when that doesn’t work, they’ll throw rotten tomatoes at me. Any comment on this concern of mine, anybody?
Comment by devhammer on 2013-08-26 17:27:00 +0000
Your best bet, if having a specific URL or extension is important to you, would be to go with a Shared instance, rather than the free tier. Then you can make the URL for your site whatever you’d like it to be using the custom domain support at the Shared tier.
Otherwise, there are not any options for changing the suffix, apart from using domain forwarding with masking, as illustrated in this blog post from my colleague Steve Maier: http://42base13.net/moving-website-to-azure/
Comment by B. Clay Shannon on 2013-08-26 19:19:00 +0000
Oh, I don’t need the free option; I was just assuming *all* the Azure sites had that unwieldy suffix. Thanks!
Comment by C.A. on 2013-08-26 21:24:00 +0000
Have been trying for some months now to track down what became of IIS Elastic Scaling (likely a 3rd party tool for Web Hosting Providers) in W2K8 and 2K8R2. Now I see that Azure has the option in terms of capacity scale-out. But what of on-premise hosting? And the need to manually intervene to set the scale-out? Here’s to automation.
Comment by devhammer on 2013-08-26 21:27:00 +0000
Not at all. At the Shared and Standard tier, you can use a custom domain name, as described in the latter portion of the blog post.
Comment by B. Clay Shannon on 2013-08-27 13:34:00 +0000
So this is what I really want: To start with the Shared plan, and if the volume of traffic starts to overwhelm the site, the Azure gerbils will automatically upgrade as necessary to handle the traffic. IOW, I want to pay as little as reasonably possible, but not at the “expense” of having users turned away because of too little gerbil power (AKA not enough back end computing power). Is this possible? IOW, I want an “Expando” plan, that will auto-grow if and when my traffic grows (I realize I will have to pay more if my traffic goes, but that’s okay – I just don’t want to pay through the nose while traffic is low).
Comment by devhammer on 2013-08-27 14:24:00 +0000
Autoscale (currently in preview) is only available for Standard tier. Depending on how many sites you are going to be running, Standard may actually end up being a money-saver, as noted by Scott Hanselman in his “Penny Pinching in the Cloud” post on the topic: http://www.hanselman.com/blog/PennyPinchingInTheCloudWhenDoAzureWebsitesMakeSense.aspx
Comment by B. Clay Shannon on 2013-08-27 16:34:00 +0000
Thanks; I will only have two sites (maintaining updating those two will take all my time, anyway).
Comment by B. Clay Shannon on 2013-08-28 01:18:00 +0000
I published my site tonight, but it automatically used the unwieldy suffix. What do I need to do to upgrade to the dot com suffix?
Comment by devhammer on 2013-08-28 11:11:00 +0000
Check out the section of the post above entitled “What’s in a Name?”. It explains the process of setting up a custom domain name for a Shared instance. You can also check out Pete Brown’s post, which is linked in that section.
