One of the best things about cloud development today is the low cost of entry. With cloud vendors competing to bring customers to their offerings, there are strong incentives to keep prices low, particularly at the entry level. Microsoft’s Azure offerings are no exception. You can get started with Azure Web Apps, whether for hosting a blog or a more full-featured application, for free, if you’re willing to accept the limitations of the free plan.
One of those limitations is that the free offering for Azure App Service does not support the use of custom domains. So any site or app you host using the free plan must use a subdomain of the azurewebsites.net domain, such as myreallycoolsite.azurewebsites.net. For development and testing, or for hosting an API that will only be called programmatically, this is no big deal. But for public facing sites, you’re going to want a custom domain. Read on to learn how easy Microsoft has made that with Azure Web Apps.
Understanding Azure Web Apps and App Services
Once a stand-alone feature called Azure Websites, today’s Azure Web Apps are a part of the Azure App Service product umbrella. This is important because it is the Azure App Service that is the container for your web app, and also the plan around which pricing is based. For the Free and Shared pricing tiers, apps have limited CPU and memory resources, and are metered on a per-app basis. The Basic, Standard, and Premium tiers are managed virtual machines dedicated to your app(s), so pricing is based on hours of usage, and you can deploy as many Web Apps as you’d like to a given App Service instance.
With that said, the cheapest option for an Azure Web App with a custom domain is the Shared service plan tier. If you just need something for dev/test with a custom domain, or your site is really low traffic, a Shared plan might suit your needs. And with a cost of around $10/mo, it’s quite affordable. For a production web site or application, you’re probably going to want to go with a Basic or higher service plan.
Custom Domain Options
Whichever service plan you choose, there are two ways you can add a custom domain to your Azure Web Apps:
- Purchase a domain from a third-party domain registrar, set up the nameserver information, and add the custom hostname to your Azure Web App. This process can vary a lot depending on the admin interface of your domain registrar and DNS providers, but you can find a basic set of instructions here. This works fine, and if you already manage multiple domains with a given registrar, it’s probably the way to go.
- Purchase a custom domain through the Azure management portal. This greatly simplifies the process of adding the custom domain, and allows you to manage both your Azure Web App and your custom domain in one place. This feature is provided through a partnership with GoDaddy, if that matters to you.
Let’s take a deeper look at that second option.
Walkthrough: Adding a Custom Domain
In the rest of this post, I’ll walk you through the scenario of creating a brand-new Azure Web App, and purchasing and configuring a custom domain for that web app, in just a few easy steps. These steps assume that you already have an active Microsoft Azure subscription, and have logged into the Azure Management Portal.
Create a New Azure Web App
First, click the + icon in the toolbar on the left of the portal window, then select Web + Mobile > Web App, as shown below:
Note that as you select different options, the management portal opens the selected options as “blades” in the UI, with previous blades scrolled out of view automatically. You can view previous blades using the scrollbar at the bottom of the window.
Next, choose an app name, Resource Group, and App Service plan/location for your app. For this walkthrough, we will assume there is no existing Resource Group, so we’ll create a new one. A Resource Group in Azure provides a handy way of grouping managing multiple types of resources, and I’ll write more about resources groups in a future post. For now, I’ll name my app customdomainwalkthrough, and the Resource Group CustomDomainWalkthrough. Note that the app name must be unique across all Azure Web Apps globally, since this name will also be the subdomain of *.azurewebsites.net by which the site is accessible publicly by default.
IMPORTANT: The App Service plan defaults to a Standard S1 pricing tier, so if you want to use Shared or Basic, you’ll want to click through and use the Create New option rather than accepting the default (you can click View All in the “Choose your pricing tier” blade to see the Basic and Shared tiers). Once you’ve provided all the required information, click Create, as shown below:
Note that I also turned off App Insights, which is outside the scope of this walkthrough.
Once you click the Create button, you’ll be redirected to the portal home page, and notified once your Azure Web App has been successfully created.
Find the Domain You Want
One reason I like the custom domain purchase process in the Azure portal is the fact that it makes it easy to find a domain that is suitable even if the exact domain you want isn’t available, thanks to helpful alternate suggestions. To get started, from the portal home screen, click the App Services icon on the left, then select the newly-created App Service (or, if you checked the “Pin to dashboard” checkbox during the Azure Web App creation process, just click the tile on the dashboard), and look for the search box at the top, and start typing the word “custom” which will filter the list of properties and settings, and then click the “Custom domains” item, which will display the Custom Domains blade, as shown below:
In the Custom Domain blade, you start the process by clicking the “Buy Domain” button, and then entering the domain name you want, filling out your contact information, and choosing the renewal and other options (the defaults should work fine for most sites, though you may want to turn off auto-renew if you are just testing). Another thing I really like here is the option for privacy for your contact information is available by default. See below for how the search and purchase process works:
Even though the domain I searched for “azuredev” wasn’t available, a similar suggested domain name, azuredevpro.com, was.
Once you click the “Buy” button for your domain, Azure will validate your domain order, complete the purchase, and bind the hostname to your Azure Web App. This process takes a few minutes, but once it’s done, everything is configured:
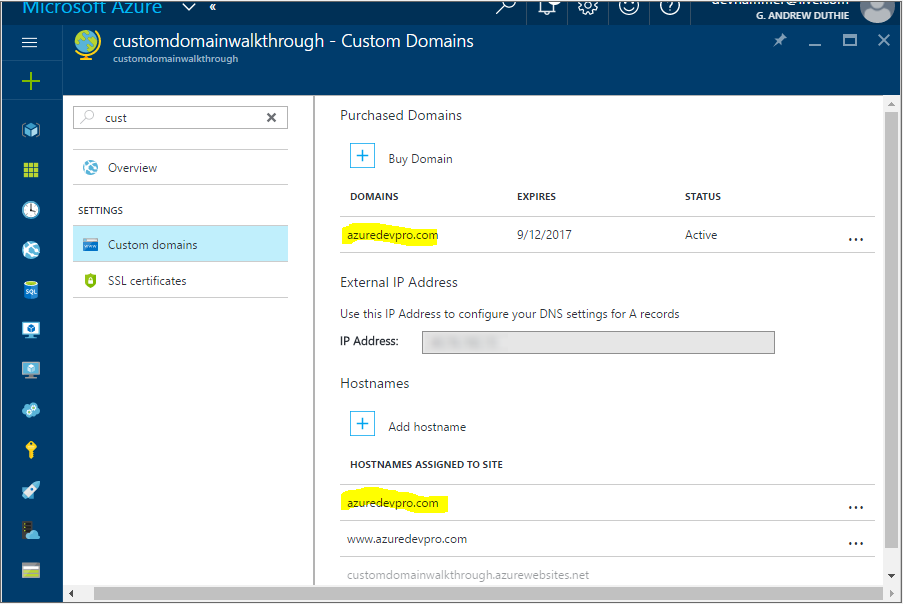
You can now access your Azure Web App from your custom domain, as shown below:

Conclusion
I’ve hosted several Azure Web Apps over the years with custom domains, all using third-party registrars and DNS hosts. While those domains weren’t hard to set up, I have to applaud Microsoft for making this process so easy. Depending on the domain registrar and DNS service you use, it can sometimes be challenging to get all of the relevant nameserver and domain record information configured just right. With the built-in domain purchase process, it really couldn’t be any easier. And the pricing is competitive with third-party options, particularly when you consider that many domain registrars charge extra for privacy protection.
Additionally, if you find that you made a mistake in the domain you purchased, Azure Web Apps gives you a time window within which you can cancel your domain purchase and receive a full refund, something I’ve not seen with other services I’ve used.
If you’re looking for a place to host your web site or application, Azure Web Apps has a lot to offer, from reasonable pricing to great scalability and manageability. The fact that you can add a custom domain so easily is just icing on the cake.
Do you or your organization need help getting up-to-speed on Microsoft Azure? I can help with training and consulting on Azure Web Apps and more. Contact me for a free initial consultation.