Make Script Performance Automatic with Custom Templates in Visual Studio 2010

Background

If you’ve ever used a tool like Yahoo!’s Yslow to analyze the performance of your web application, you’ve probably run into the recommendation that you should put your scripts at the bottom of the page, unless those scripts insert page content (a good example of this, which we’ll see later in this post, is modernizr.js, which dynamically adds support for semantic HTML5 elements to older browsers that do not natively support them).

Unfortunately, if you use the default MVC 3 templates in Visual Studio 2010, things like the script reference for jQuery are added in at the top of the page, in the <head> section of the document. This works fine, but may potentially delay the loading of the page while the external script is downloaded and loaded. You could, of course, manually move the script references each time you create a new project, but this would result in unnecessary duplication of effort.

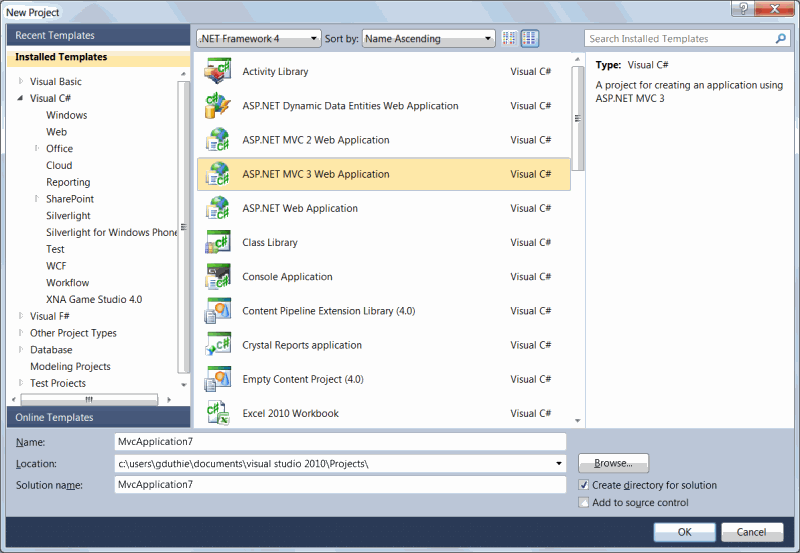
In part 1 of this series, I’m going to walk you through how you can easily take an existing project with your preferred tweaks, and turn it into a custom project template.In part 2, I’ll show you how you can also tweak the behavior of the New Item templates, so that scripts for things like validation also end up in the desired spot. Finalliy, in part 3, I’ll show you how to customize the default template for your preferred project type. For all of these tutorials, we’re going to start with the ASP.NET MVC 3 Web Application template, as shown in the image below:

CustomTemplates1

Since I have the MVC 3 Tools Update installed, I’m also going to take advantage of the built-in support for HTML5 in the project template, to use the new semantic HTML elements in my custom template.

Tutorial – Exporting Templates

  1. Our first step will be to create a project from our desired starting template, so starting from the screen above, select the ASP.NET MVC 3 Web Application template, and name the project “MVC3ScriptsAtBottom” (the name isn’t really important, but this will help us remember what the project was for later on).
  2. In the New ASP.NET MVC 3 Project Dialog that appears next, select the Internet Application template, and check the Use HTML5 semantic markup checkbox (this adds <header>, <nav>, <section>, and <footer> tags to the page in place of <div> tags, and also inserts a script reference to the modernizr javascript library which, among other things, can shim older browsers to support these elements), leave the View engine set to Razor, and then click OK.
  3. Once the project has been created, open Views\Shared\_Layout.cshtml. In the <head> section, you’ll see the following:
       1: <head>
       2:    <meta charset="utf-8" />
       3:    <title>@ViewBag.Title</title>
       4:    <link href="@Url.Content("~/Content/Site.css")" rel="stylesheet" type="text/css" />
       5:    <script src="@Url.Content("~/Scripts/jquery-1.5.1.min.js")" type="text/javascript"></script>
       6:    <script src="@Url.Content("~/Scripts/modernizr-1.7.min.js")" type="text/javascript"></script>
       7: </head>

    Both the <meta> element and the modernizr script reference need to remain in the <head> section, but we can move the jQuery script reference lower in the page (keeping in mind that any scripts using jQuery must be loaded after jQuery itself has been loaded).

  4. Highlight line 5 above and use Ctrl+X (or Edit | Cut) to cut the jQuery reference and place it on the clipboard. Then place the cursor at the beginning of the </body> element, and use Ctrl+V (or Edit | Paste) to paste the reference in its new home. I also like to add a <script> block for in-page scripts, to remind myself that any jQuery-reliant scripts need to go here, like so:
       1:     </div>
       2:     <script src="@Url.Content("~/Scripts/jquery-1.5.1.min.js")" type="text/javascript"></script>
       3:     <script type="text/javascript">
       4:         // any jQuery-reliant scripts should go here
       5:     </script>
       6:  </body>

    Save _Layout.cshtml.

  5. While we’re at it, let’s go ahead and add one more optimization. Loading script libraries from our web server is OK, but we can get some potential performance improvements by using a Content Delivery Network (CDN). Using a CDN has two advantages…first, the files on a CDN are spread around many servers across the internet, meaning that there may be a server hosting the file that is closer to the client than your web server. Second, using a CDN improves the likelihood that the user may already have a cached copy of the file in their browser cache (since the CDN version of the file will be cached for any site that uses that URL, not on a per-domain basis). So let’s swap the local script reference on line 5 above for the ASP.NET AJAX CDN version (you can always find the latest versions of files hosted on the CDN at http://www.asp.net/ajaxlibrary/cdn.ashx) (line break added for readability):
       1:  <script src="http://ajax.aspnetcdn.com/ajax/jQuery/jquery-1.6.1.min.js"
       2:      type="text/javascript"></script>
  6. At this point, our simple example is complete, and we can start the export…select File | Export Template… In the first page of the Export Template Wizard, select Project Template (the default) and accept the selected project, then click Next >. The dialog should look similar to the image below:
    CustomTemplates2
  7. Click Finish to save the template.
  8. Open a new instance of Visual Studio 2010, and select File | New | Project… To make it easy to find our new template, just type “Bottom” in the search box in the upper right corner of the New Project dialog. Select the MVC3ScriptsAtBottom template, give the project a name of your liking, and click OK.
  9. Open up Views\Shared\_Layout.cshtml and verify that our scripts are at the bottom where we want them.
  10. And just to make sure things work as expected, add the following line to the <script> block at the bottom:
       1:      <script type="text/javascript">
       2:          // any jQuery-reliant scripts should go here
       3:          $("#main").css("background-color", "red");
       4:      </script>
  11. Run the project (Ctrl+F5) to verify that the script executes as expected. You should see a page similar to the following image:
    CustomTemplates3

Limitations of Exported Templates

One big limitation of this technique is that it’s static in nature. Once I’ve created my project, tweaked it, and exported it as a template, I no longer get the New MVC 3 Project dialog, so I can’t choose to not include the HTML5 semantic elements, or create a Unit Test project at the same time as I create my MVC project. For more on some of the many options you have with Visual Studio templates, see the topic “Customizing Project and Item Templates” on MSDN.

Another limitation of the exported template is that it does not address the item templates used to create new views, some of which (typically create and edit) will add script references for purposes of validation. In the next part of this series, I’ll show you how you can customize these templates to move their scripts to the bottom of the page.

One last limitation is that having a <script> block at the end of our Layout page is of limited utility, since more often than not, we’d want to have the scripts in our View, not our Layout page. In part 2 of this series, I’ll show you how we can use some Razor magic to address this limitation as well.

DevNugget Available

For folks who prefer their tutorials in video format, there’s a DevNugget screencast of this topic available. You can find it on the DevNuggets show site on Channel 9.

Special Thanks

Special thanks to Chris Love, who sparked the idea for this post with an email to a list I’m on regarding this very topic.

Additional Resources:

One thought on “Make Script Performance Automatic with Custom Templates in Visual Studio 2010”

Leave a Reply

Your email address will not be published. Required fields are marked *

This site uses Akismet to reduce spam. Learn how your comment data is processed.